
I came up with this presentation style more than 10 years ago, when it would still take hours to render a scene.
This sketchy style takes 2 minutes to prepare in Sketchup,
and 2 minutes to process in Photoshop.
So all that time ago it was my go-to solution for time-sensitive projects.
So all that time ago it was my go-to solution for time-sensitive projects.
Nowadays, most render engines can render in 4K in a couple of minutes. But I think this style can still be relevant for the following reason.
I find that when discussing design "concepts" or design "options" with a client, a photorealistic rendering can give the idea that things such as materials, room features, furniture selection etc. are set in stone, that they are not open for discussion.
A sketch, however, is an invitation to dig into these design concepts and options, brainstorm without pressure and gather the information that will then go into the final design and photoreal renderings.
THE PROCESS
We're going to extract 4 pictures of a scene from the Sketchup model,
and blend them in Photoshop to achieve this textured-sketch look.
Basically, in Photoshop we are going to use the shadows to mask the textures,
Basically, in Photoshop we are going to use the shadows to mask the textures,
and then use dynamic blurs on these masks.
1- IN SKETCHUP
SCENE 1: THE "TEXTURES"
Preliminaries:
Think about the ratio you want for your final picture.
Think about the ratio you want for your final picture.
This will inform how you frame your scene in Sketchup.
I like a 4:3 ratio, that displays nicely on iPads and such.
So I'd export the pictures below in the size 3500 x 2625 px and work with that ratio and size in Photoshop.
So I'd export the pictures below in the size 3500 x 2625 px and work with that ratio and size in Photoshop.
1- Find a perspective that works well for you and create a "scene" called "Textures" to save it.
I like using a 2-points perspective, usually with a camera height of about 120cm for interior scenes.
(in the top bar menu go to CAMERA > 2-points perspective)
(in the top bar menu go to CAMERA > 2-points perspective)
Try exporting it to see if it works well in the ratio you picked.
2- Then, toggle ON the shadows and adjust the time of day and date to find something that gives you plenty of shadows projected on your model.
(Shadow LIGHT value at 100%, DARK value at 50%)
You may want to turn OFF the "cast shadows" option in the Entity Info of the ceiling and walls.
(Shadow LIGHT value at 100%, DARK value at 50%)
You may want to turn OFF the "cast shadows" option in the Entity Info of the ceiling and walls.
3- Finally, in the top menu bar, go to VIEW > Edge Style and turn OFF all edge types.
Update the scene to save these changes.

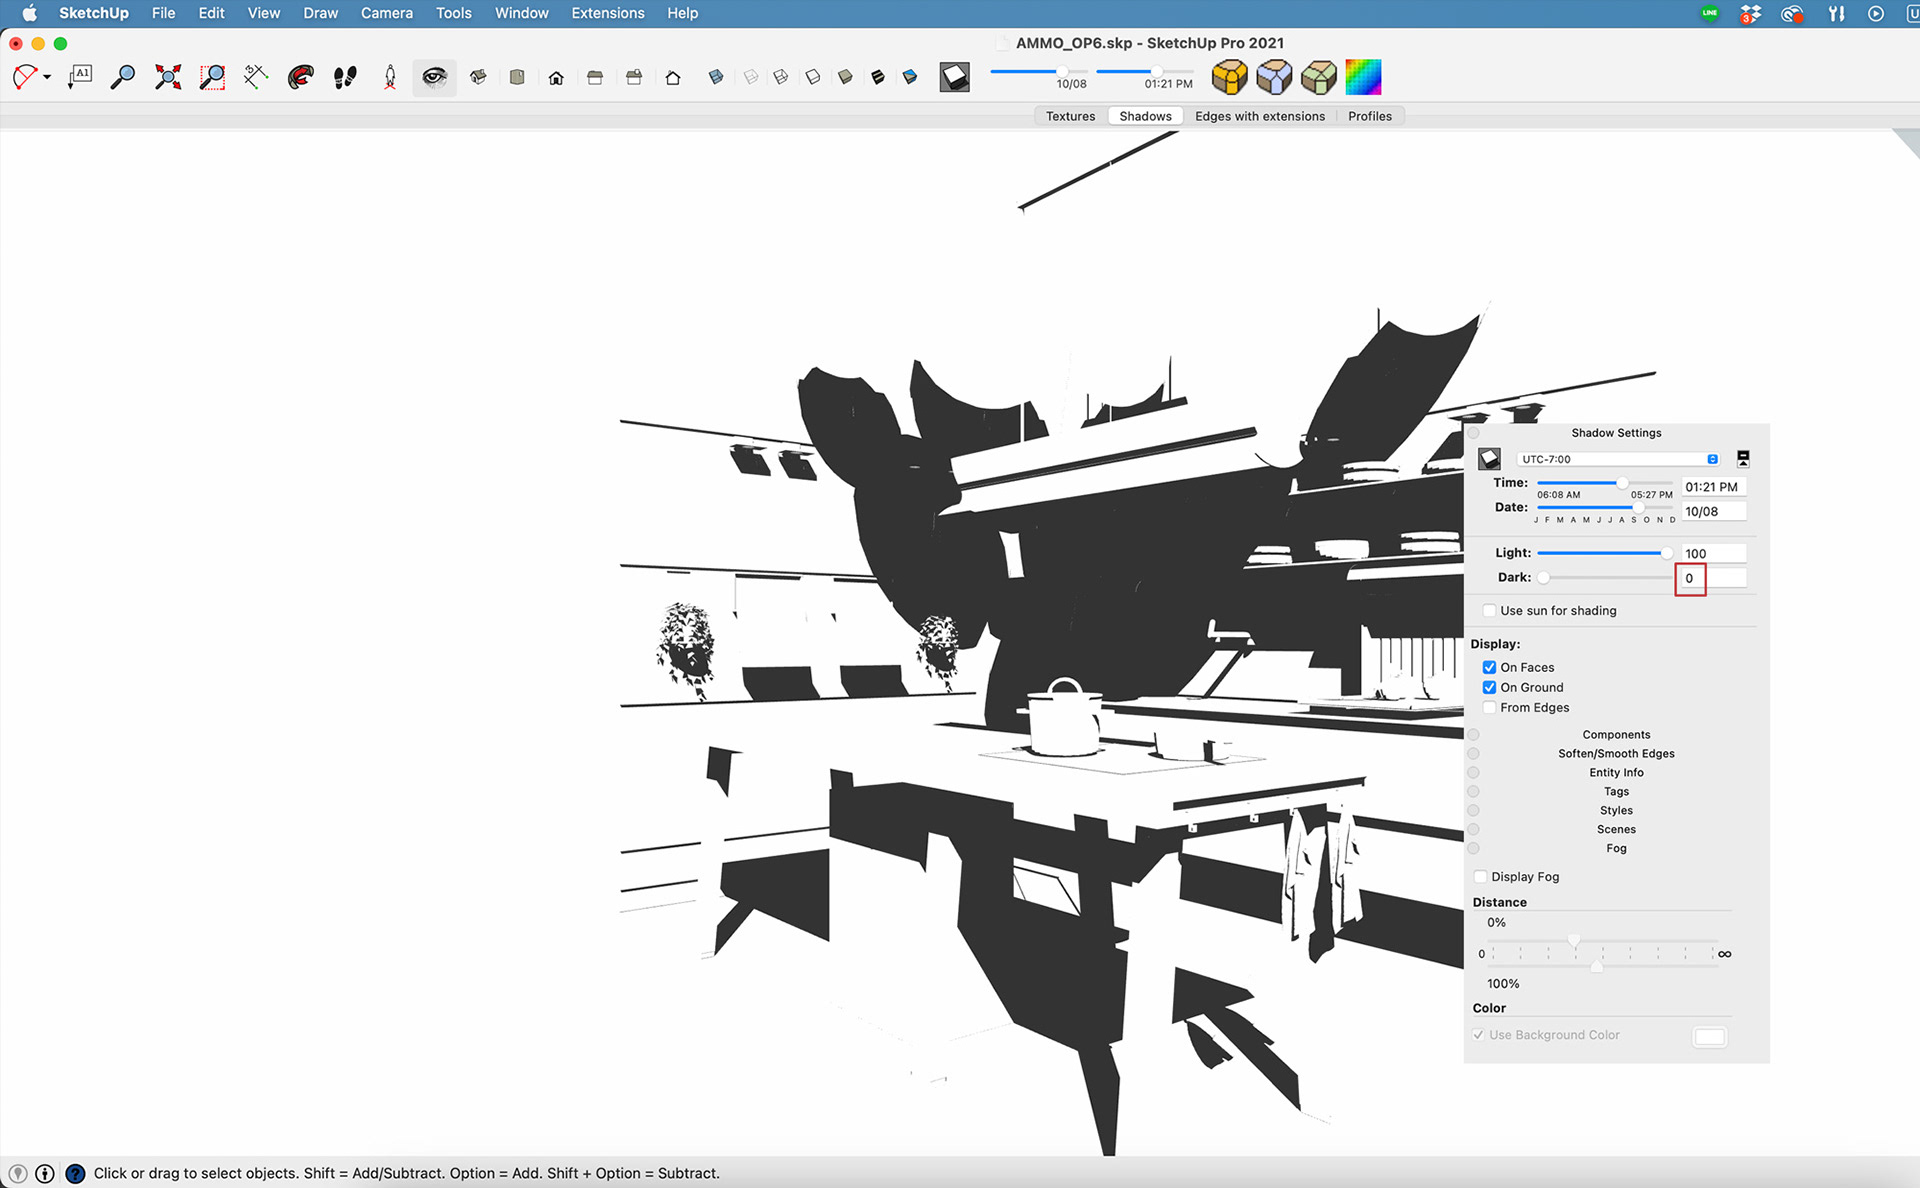
SCENE 2: THE "SHADOWS"
1- First, we don't want to see any textures here.
So select the "Hidden Lines" style to override all textures with white.
Create a new scene to save this setting and name it "Shadows".
Create a new scene to save this setting and name it "Shadows".
2- In the shadow settings, bring the DARK value down to 0 to make the shadows plain black.
Update the scene to save the changes.
Update the scene to save the changes.
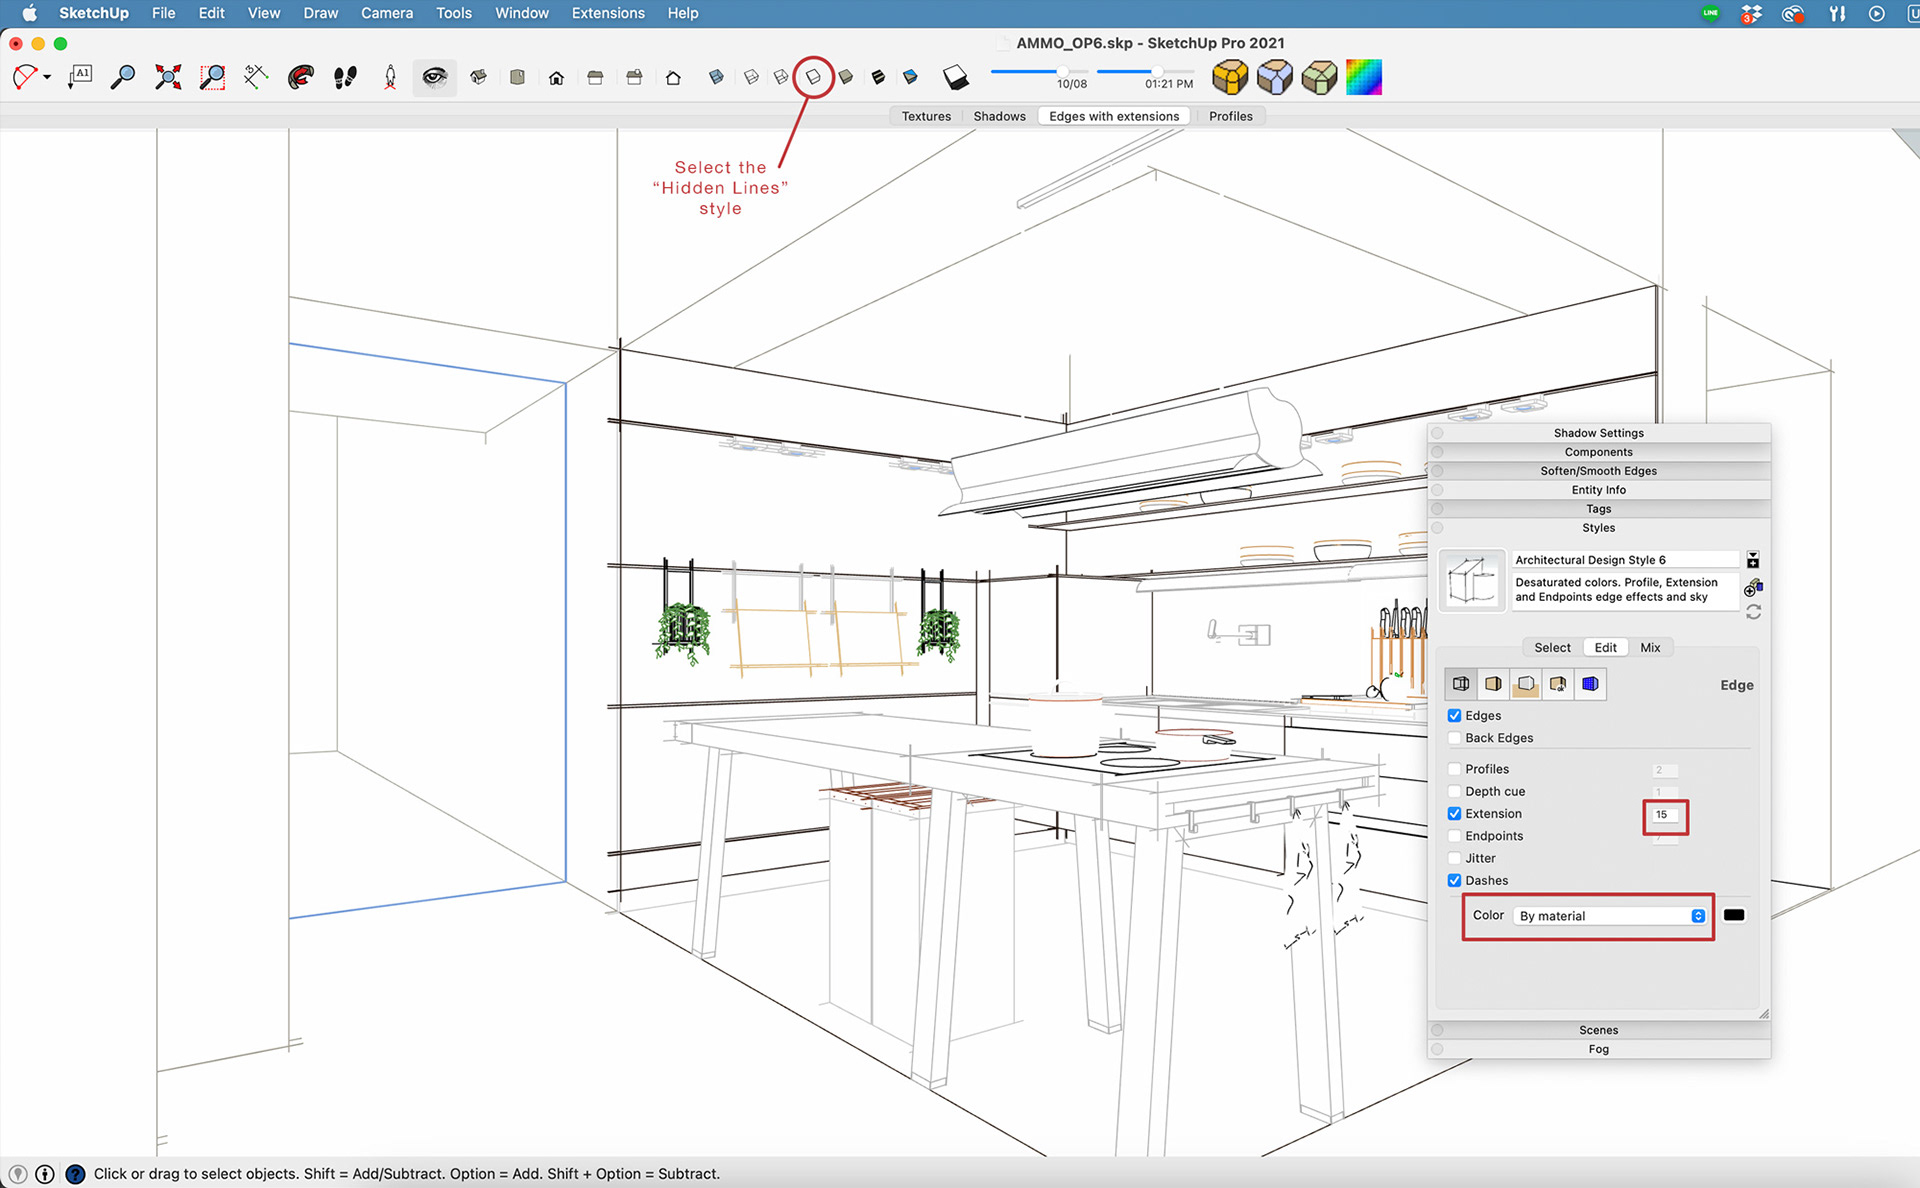
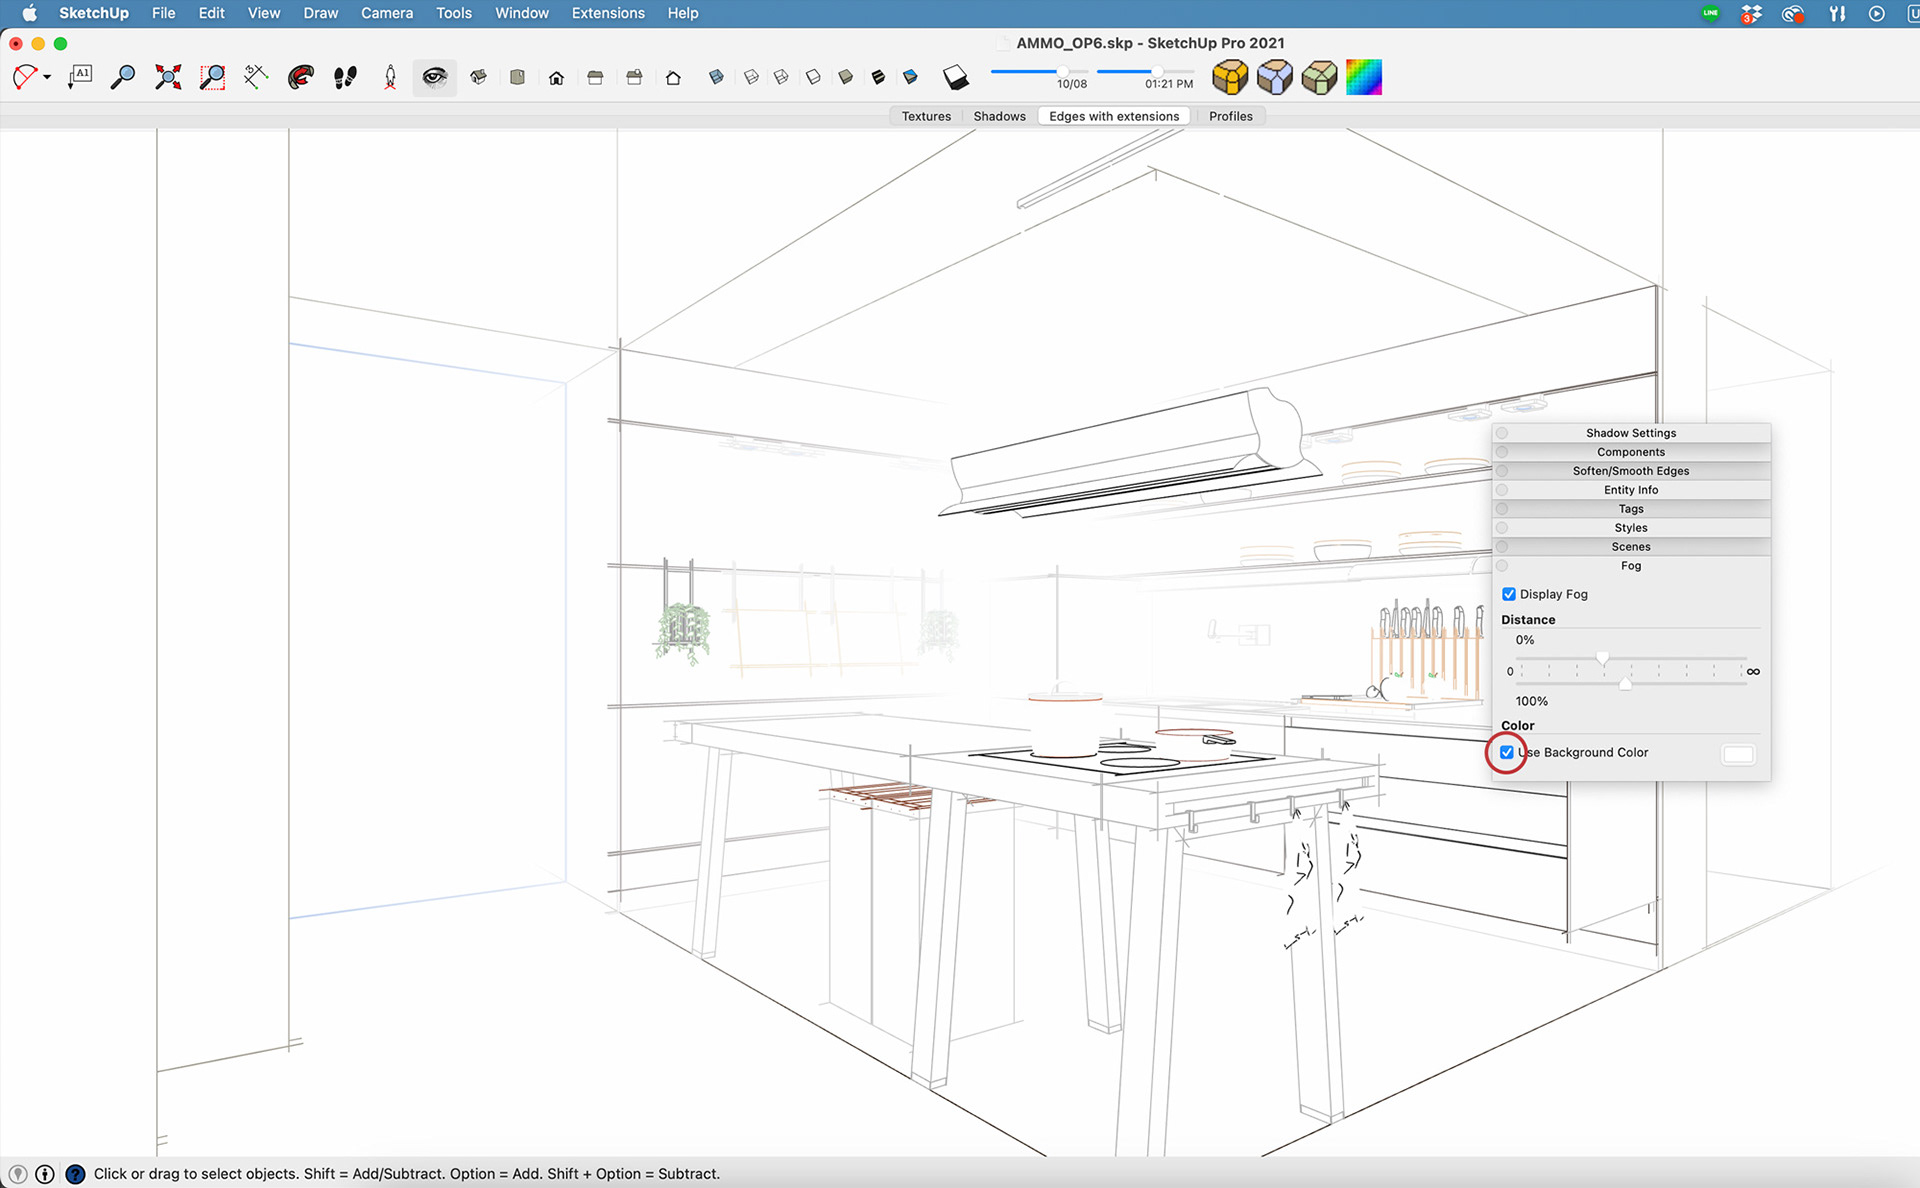
SCENE 3: "EDGES WITH EXTENSIONS"
Then, we are going to create another scene displaying edges only, in a sketchy style.
1- From the "Shadows" layer, turn OFF the shadows.
Create a new scene to save this setting and name it "Edges with extensions".
Create a new scene to save this setting and name it "Edges with extensions".
2- Then, in the "Styles" panel, go to SELECT and pick an edge style preset that you like, something like "crayon" or "marker thin".
Then hit on EDIT and add some extensions, adjust their length as you wish, and set the colour of these edges "by material".
Then hit on EDIT and add some extensions, adjust their length as you wish, and set the colour of these edges "by material".
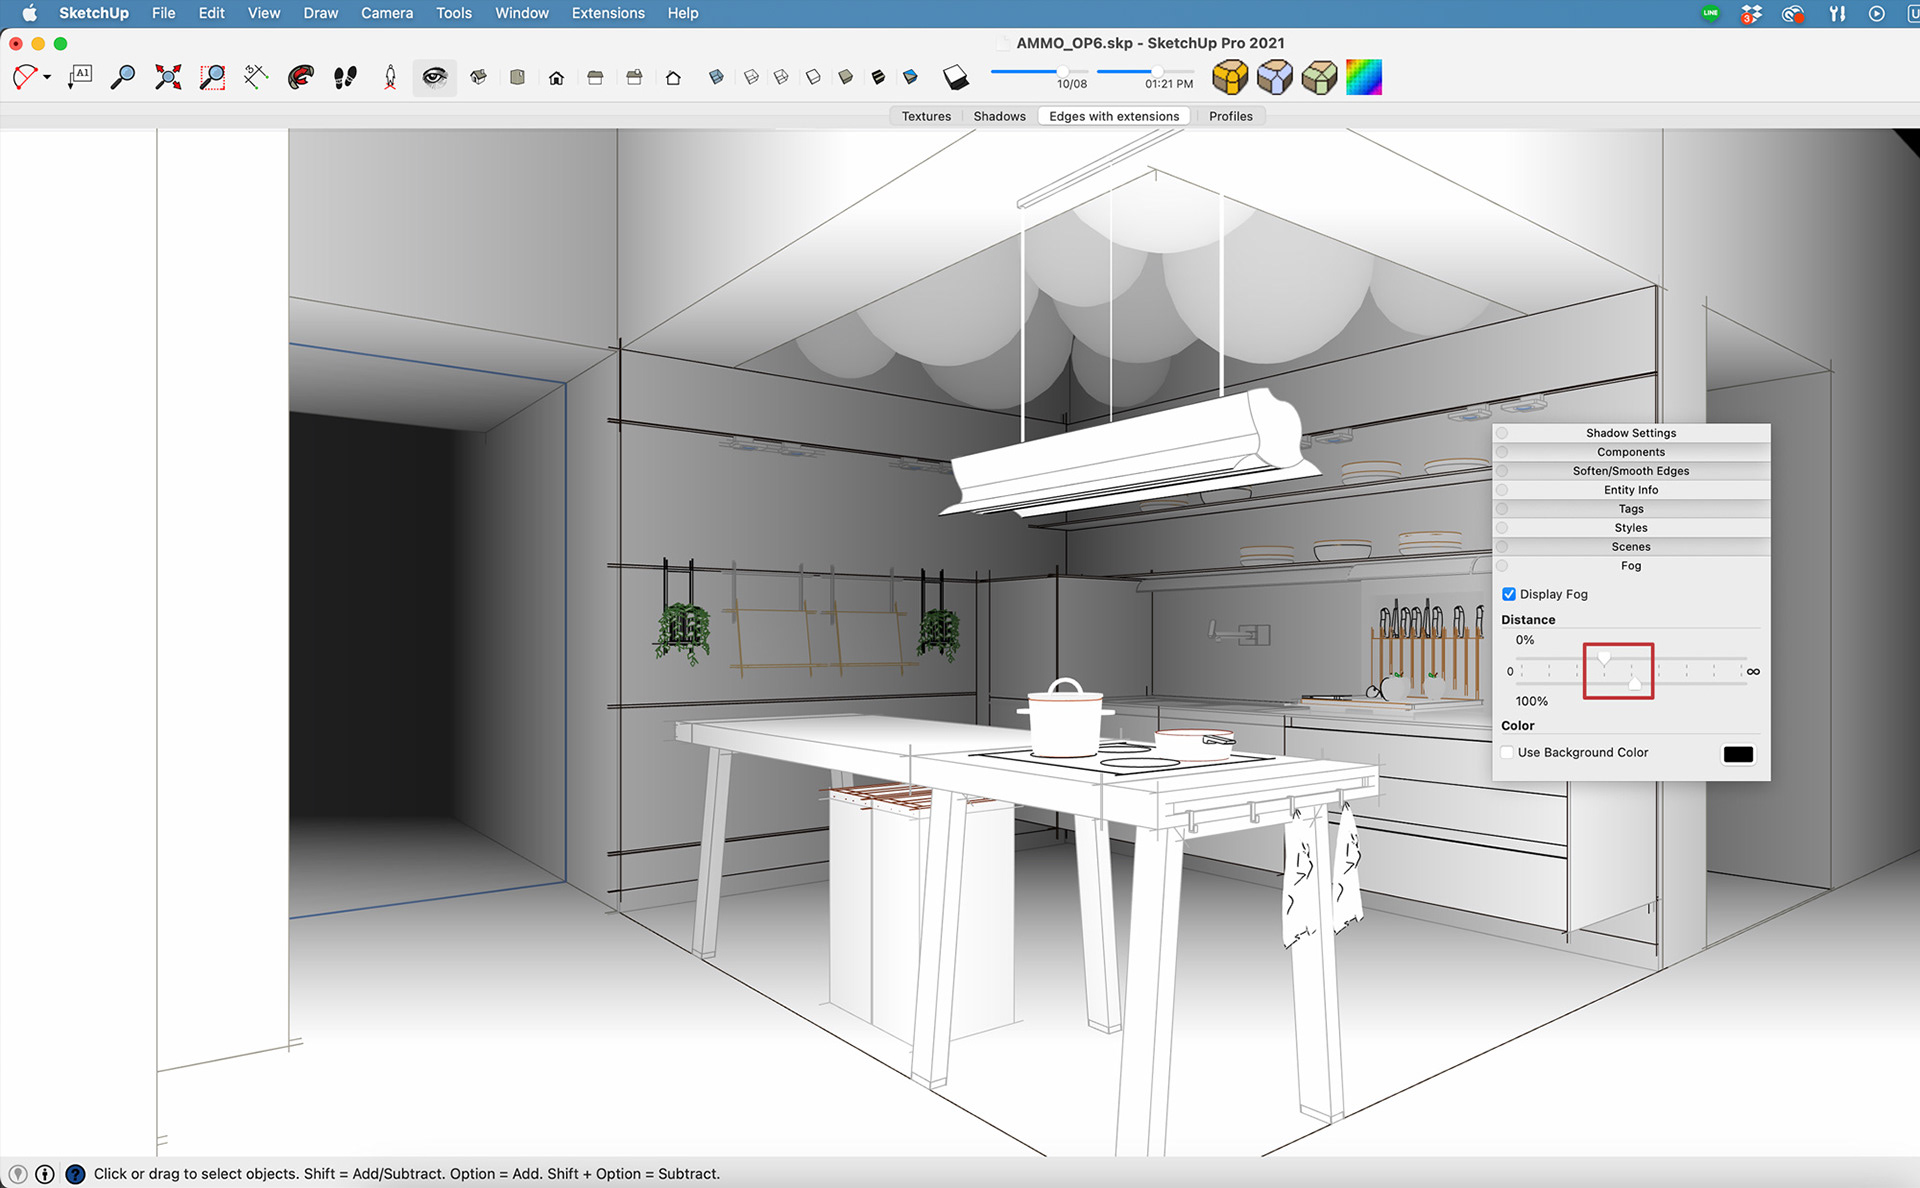
3- Finally, we are going to add some "fog" to the scene to make the edges fade in the background while staying sharp in the foreground.
I recommend using a "black" fog colour at first, to see clearly how it dissipates through your scene, and once you're happy with the result, switch to a "white" fog.
Update the scene to save these modifications.
I recommend using a "black" fog colour at first, to see clearly how it dissipates through your scene, and once you're happy with the result, switch to a "white" fog.
Update the scene to save these modifications.
SCENE 4: "PROFILES"
1- From the "Edges" scene, in the Style panel, turn the edges and extensions OFF.
Then turn ON the profiles, with a thickness of about 2, and select color "by material".
Then turn ON the profiles, with a thickness of about 2, and select color "by material".
Create a new scene called "Profiles" to lock-in these new settings.
2- As for the previous scene, add some fog to fade the profiles in the background.
Update your scene.
Update your scene.

That's it for the Sketchup part!
Now you can export each of these scenes as a picture in the format and size you want.
Now you can export each of these scenes as a picture in the format and size you want.
Like I mentioned at the beginning, I like the 4:3 ratio and exported these pictures in a size of 3500 x 2625 px.
2- IN PHOTOSHOP
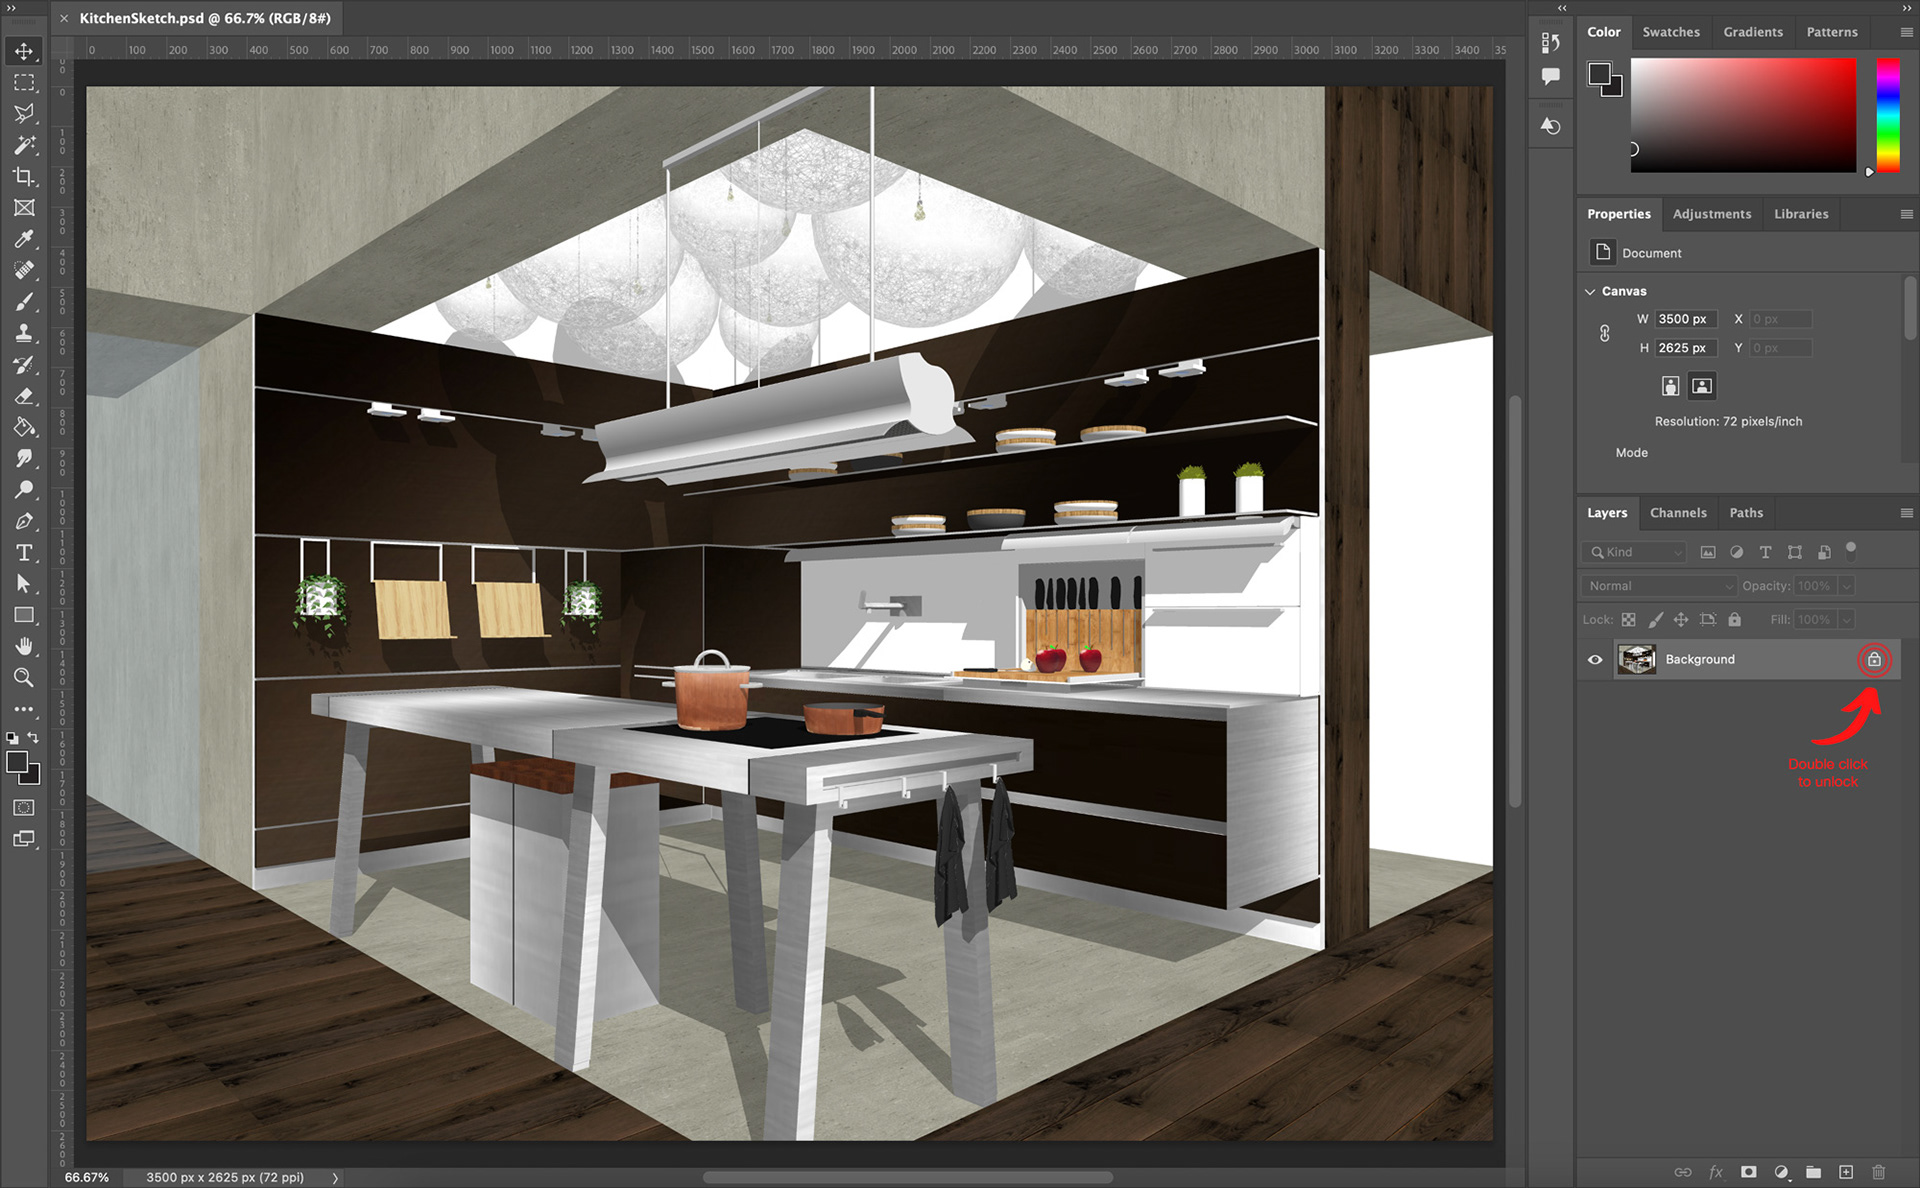
In your project folder, select the "Textures" picture and open it in Photoshop, which will create a document of just the same size and ratio.
On the picture's layer, double-click on the "lock" icon to unlock the layer.
Then right-click on the layer and select "Convert to Smart Object".
Since we are going to duplicate this layer later, it will make it easier if in the future you need to update the picture in all the duplicates at once, since now they are all linked together.
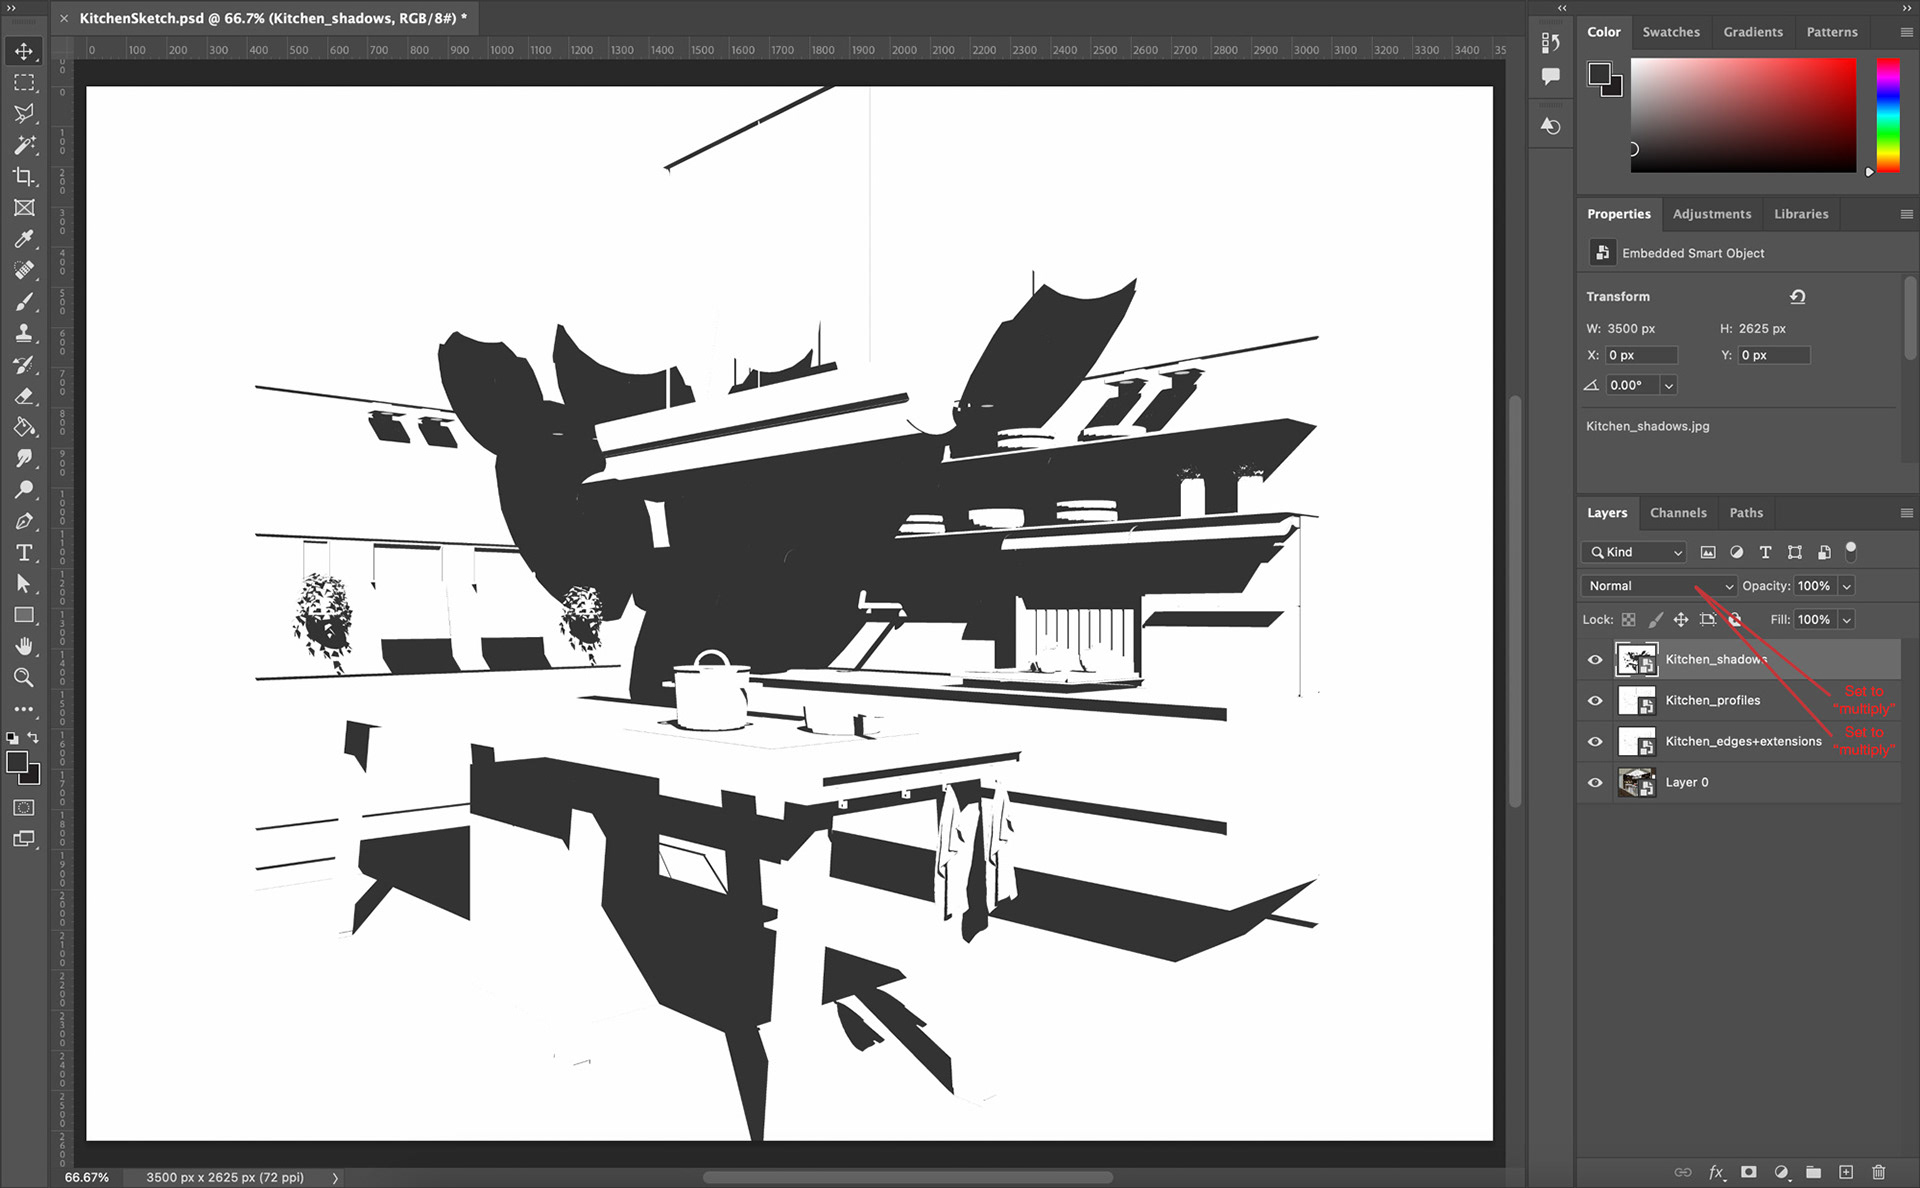
Then, throw in the other 3 pictures on top of this layer, with the "Shadows" layer at the top of the stack.
Change the blending mode to "multiply" for the "Edges" and "Profiles" layers.
Change the blending mode to "multiply" for the "Edges" and "Profiles" layers.
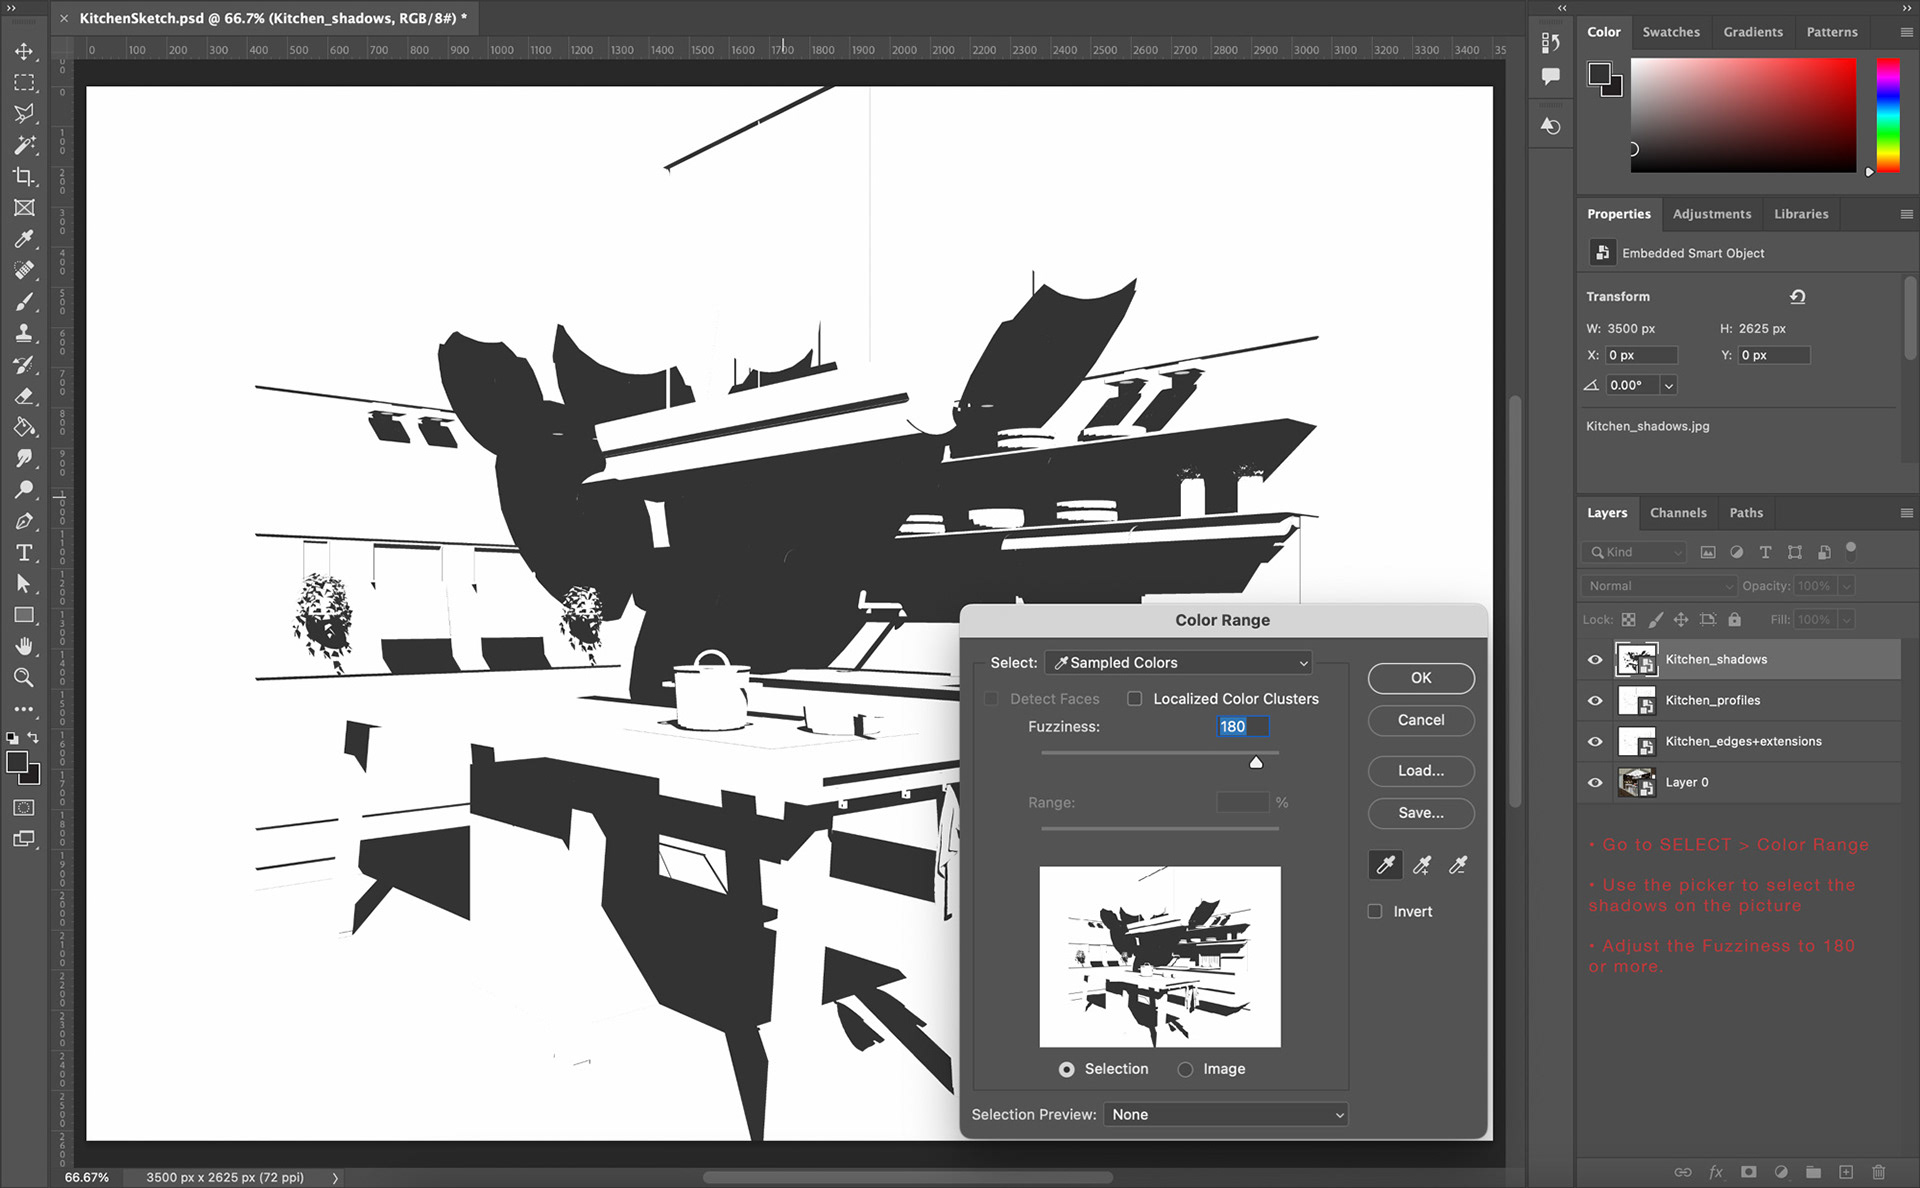
In the main top menu bar, go to SELECT > Color Range.
Use the picker to select the shadow area on the shadow picture.
Adjust the Fuzziness from 180 to 200.
Click OK and toggle OFF the "Shadows" layer to hide it.
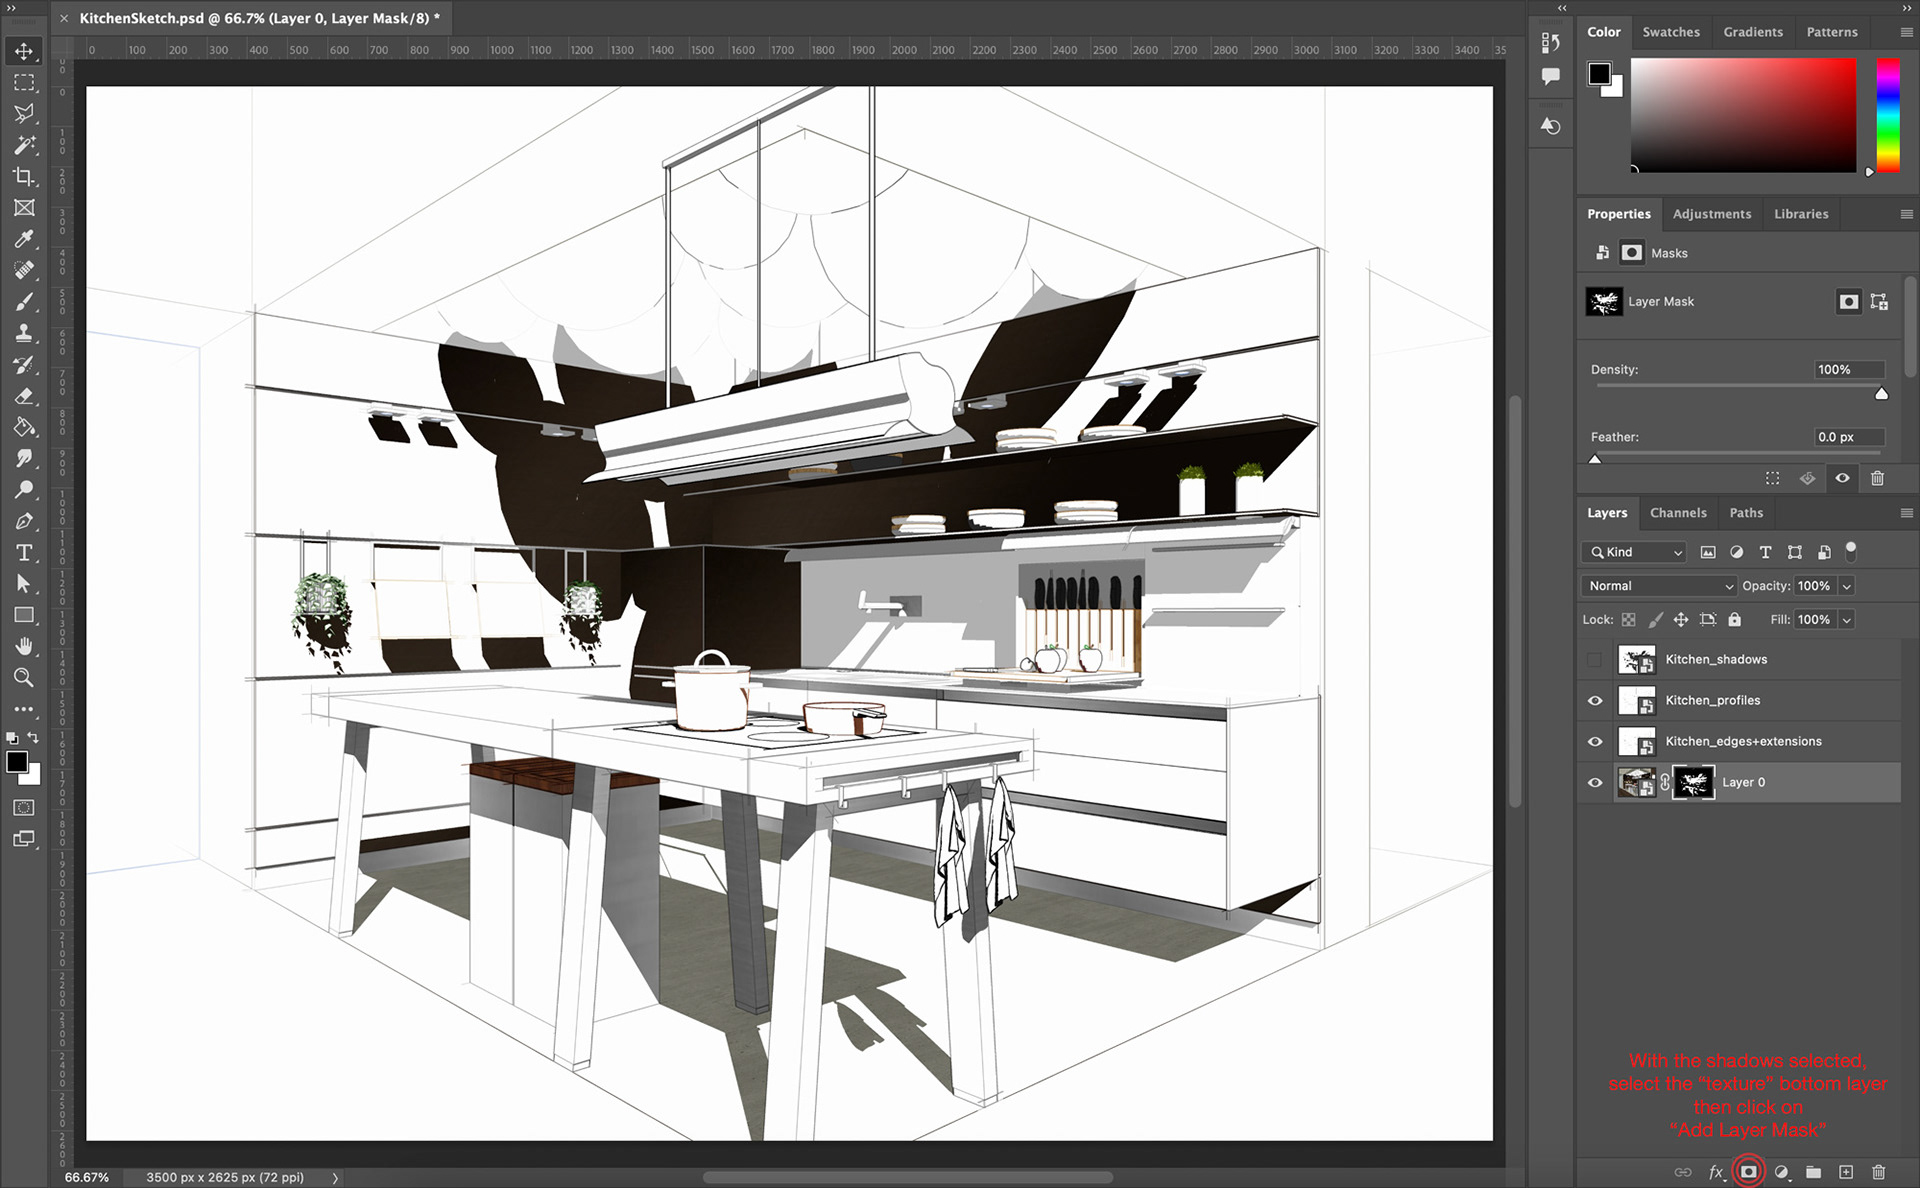
Then, select the "Textures" layer at the bottom of the stack,
and hit "Add layer mask" like shown on the picture below.
You have now masked the textures using the shadows.
You have now masked the textures using the shadows.
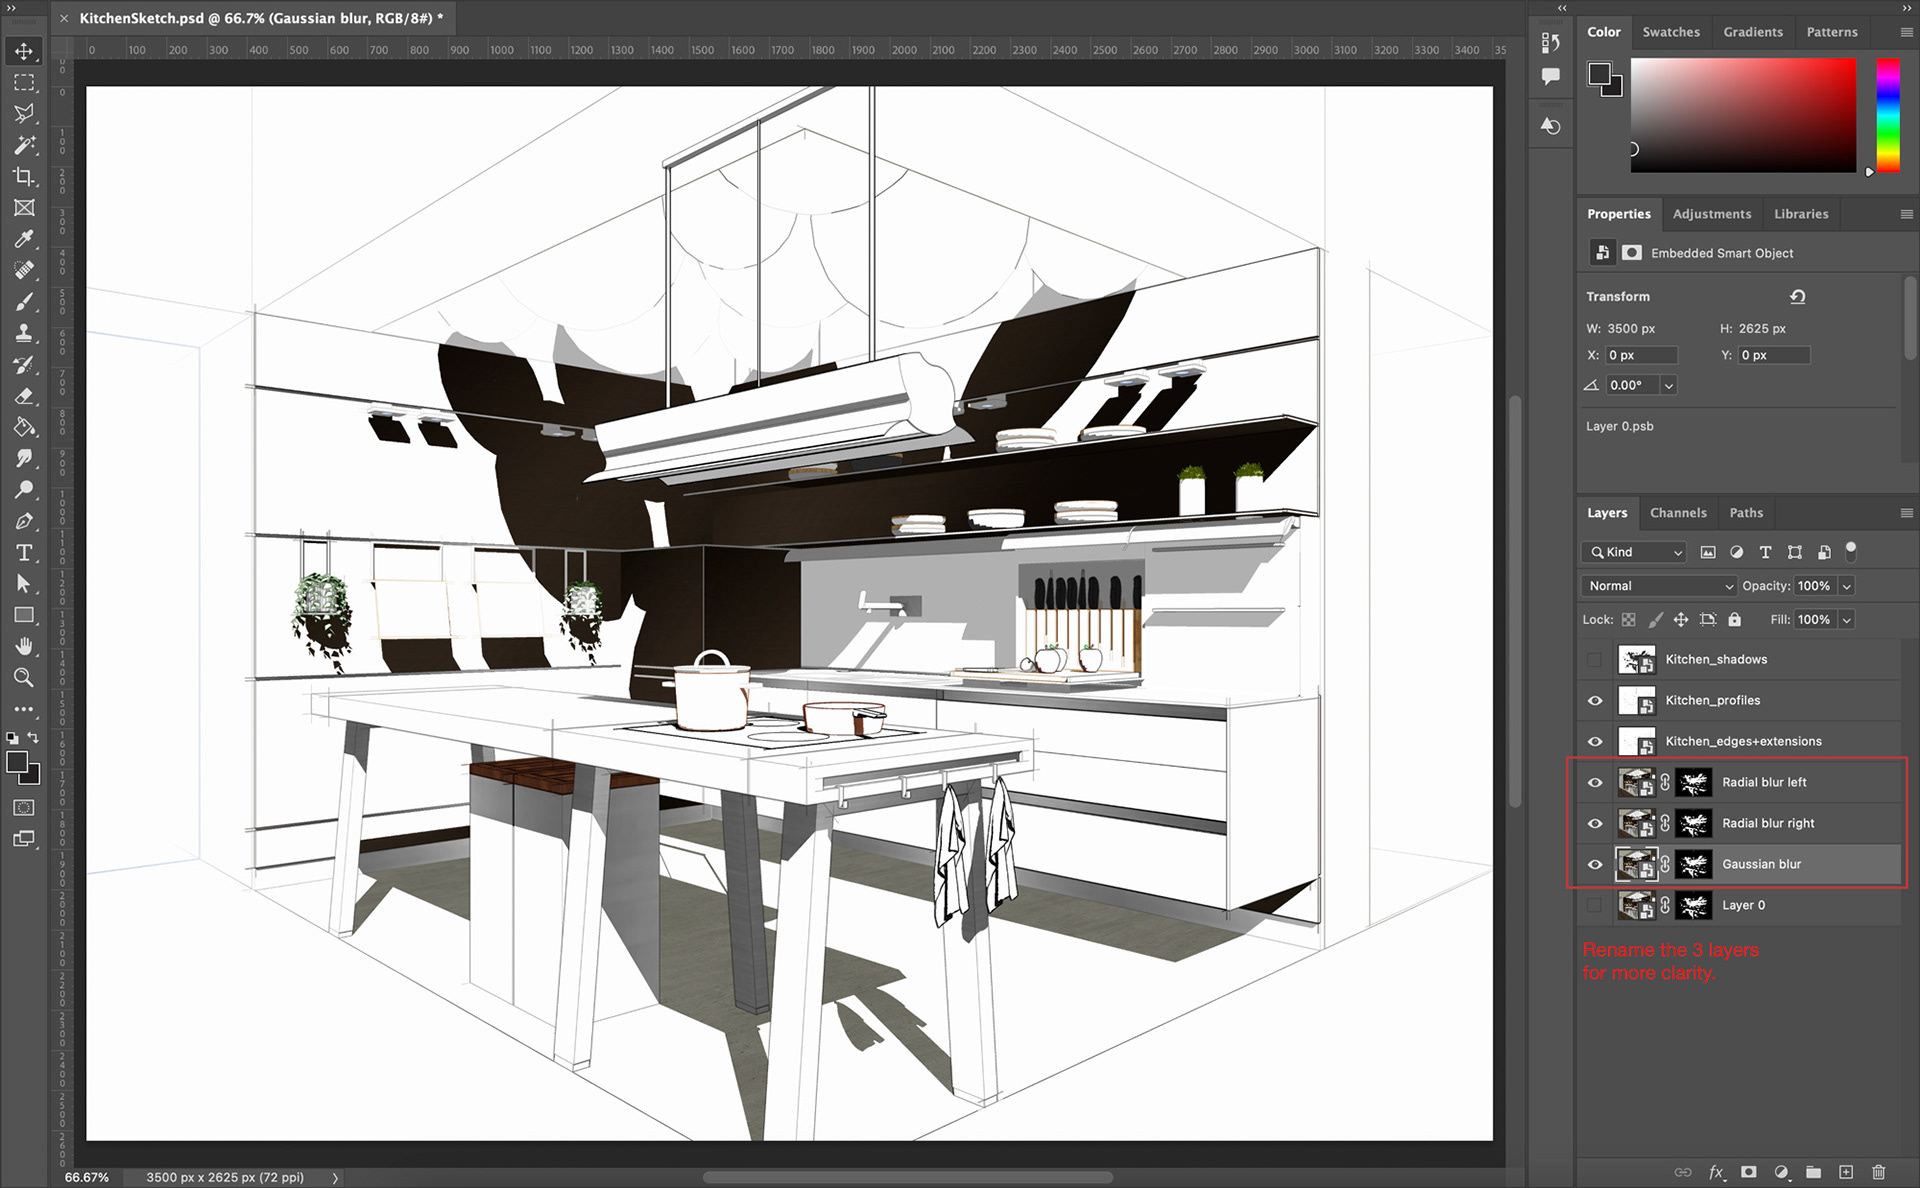
Duplicate 3 times the "Textures" layer.
Deactivate the bottom layer (we keep it as a backup if we mess up some steps later).
And rename each of the 3 duplicates as follow:
- Radial blur left
- Radial blur left
- Radial blur right
- Gaussian blur.

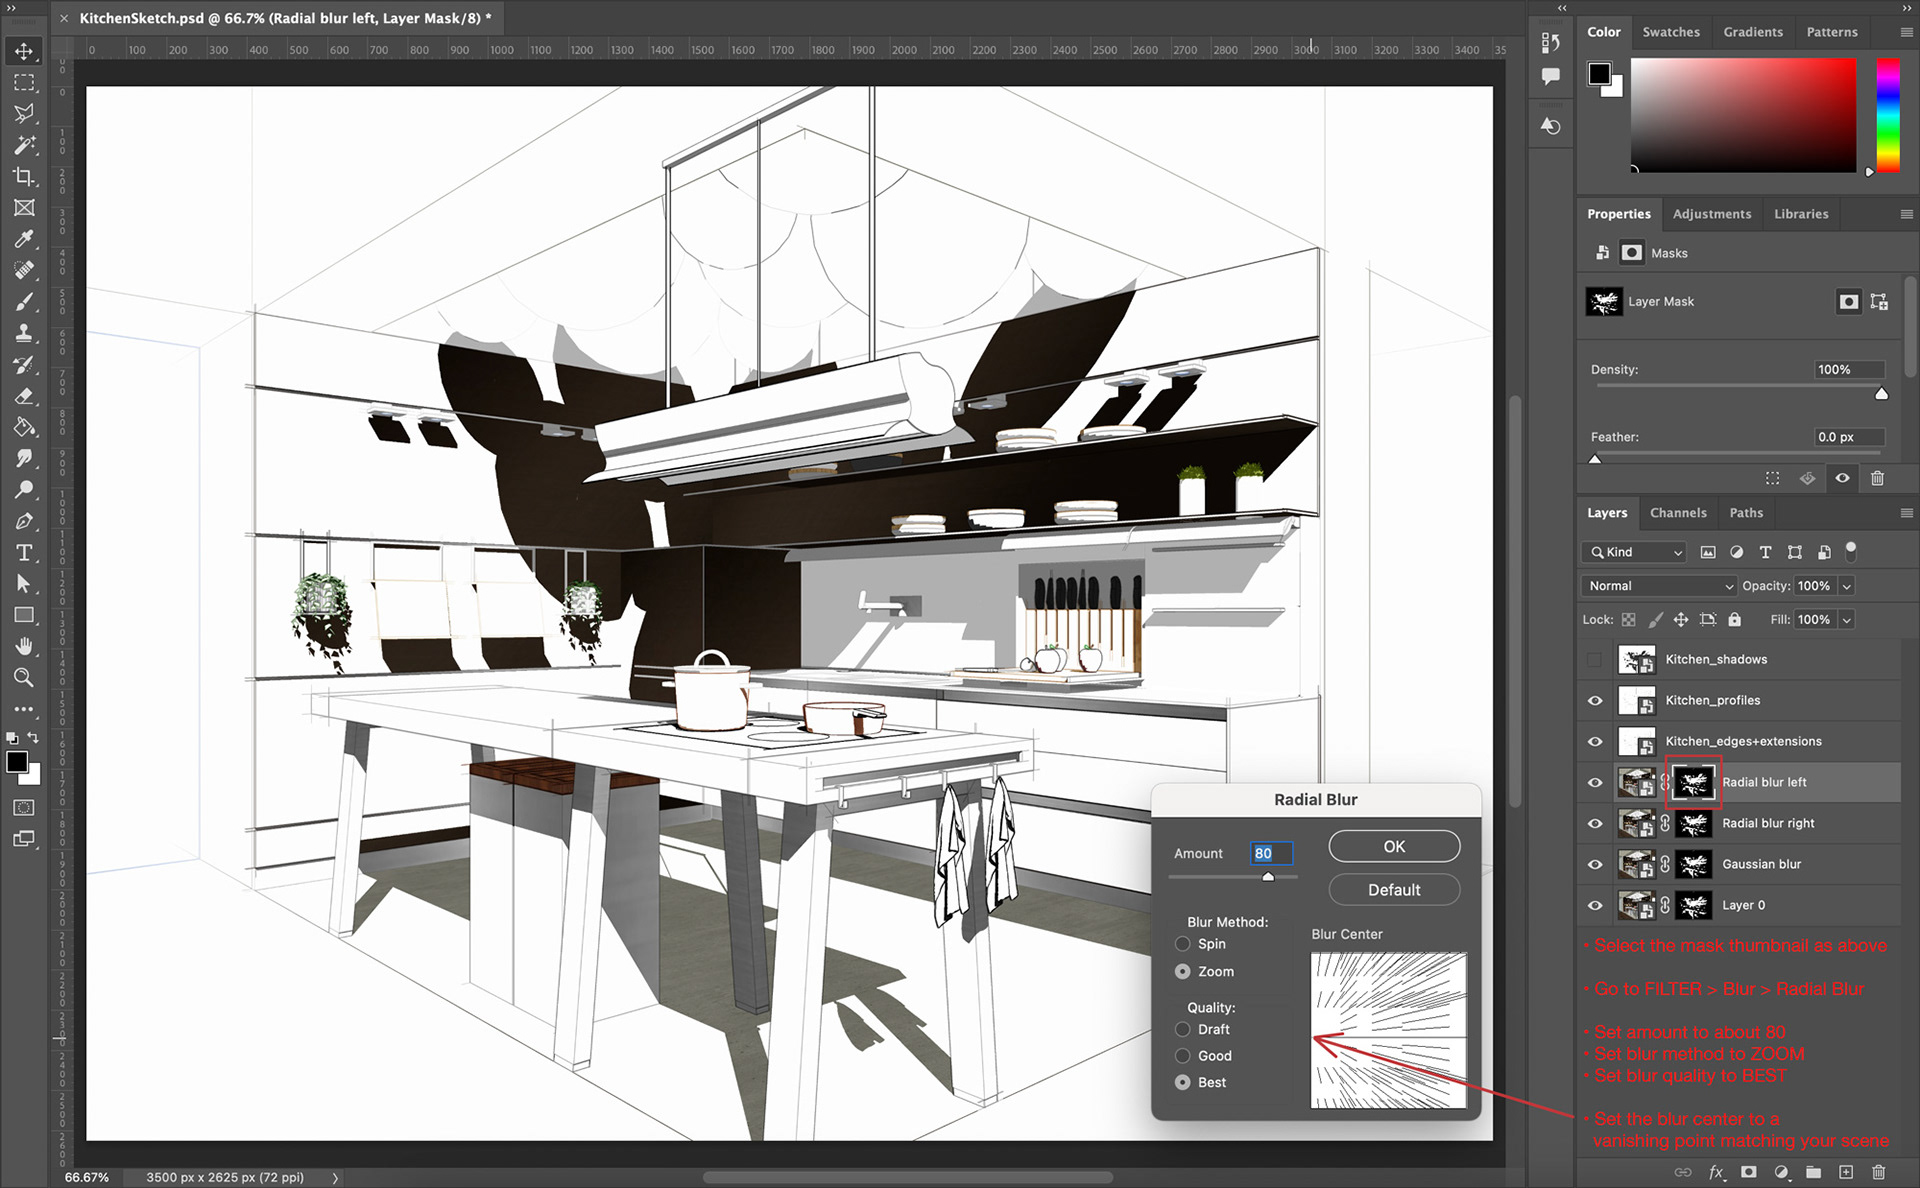
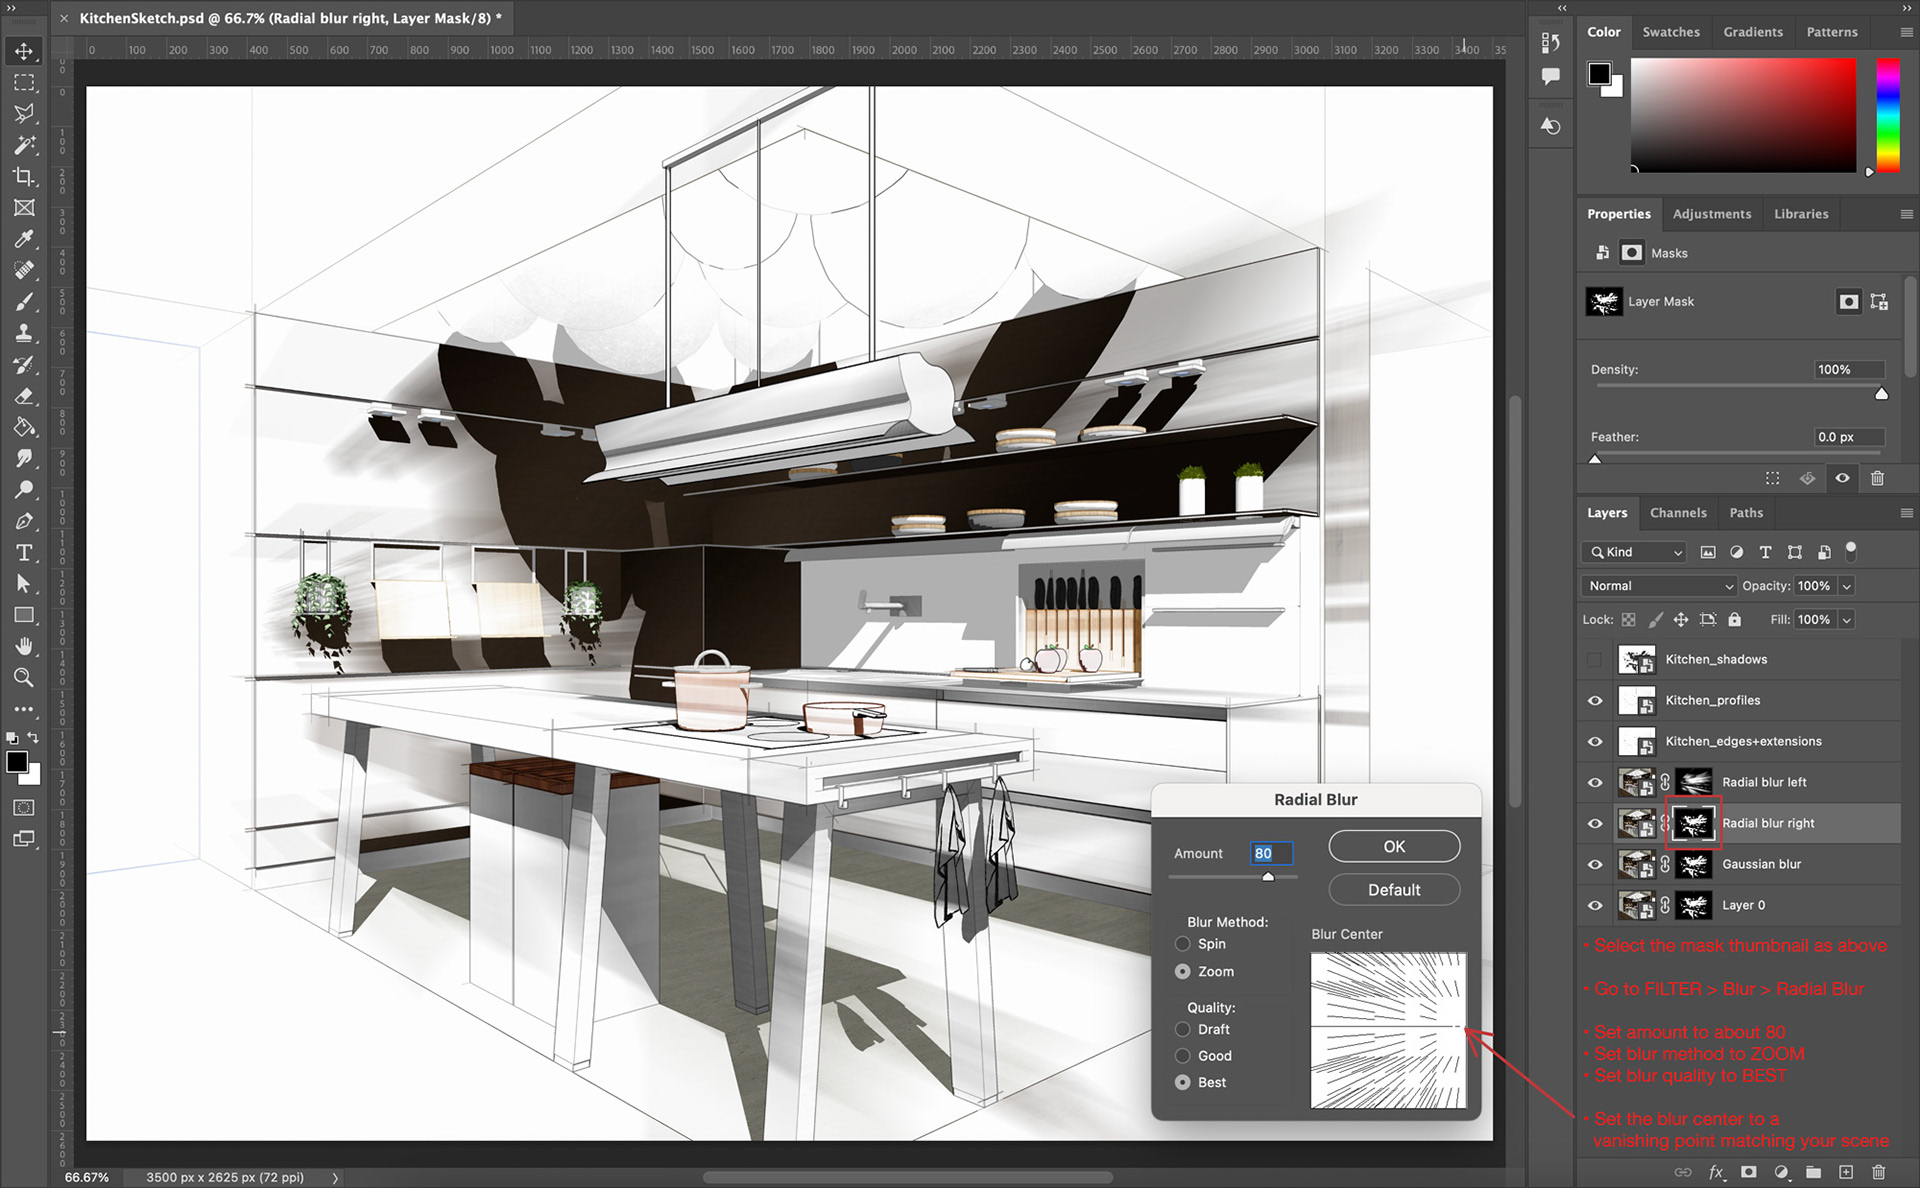
Now let's add some blur to these masks to reveal more of the textures.
First, click on the mask thumbnail of the layer called "Radial blur left".
Go to FILTER > Blur > Radial Blur.
Set the Amount to 80 or so.
Set the "Blur Method" to ZOOM.
Set the Quality to BEST.
Then, in the "Blur Center" window, adjust the center to match the left vanishing point of your scene.
Once you get it right, click OK.
Once you get it right, click OK.
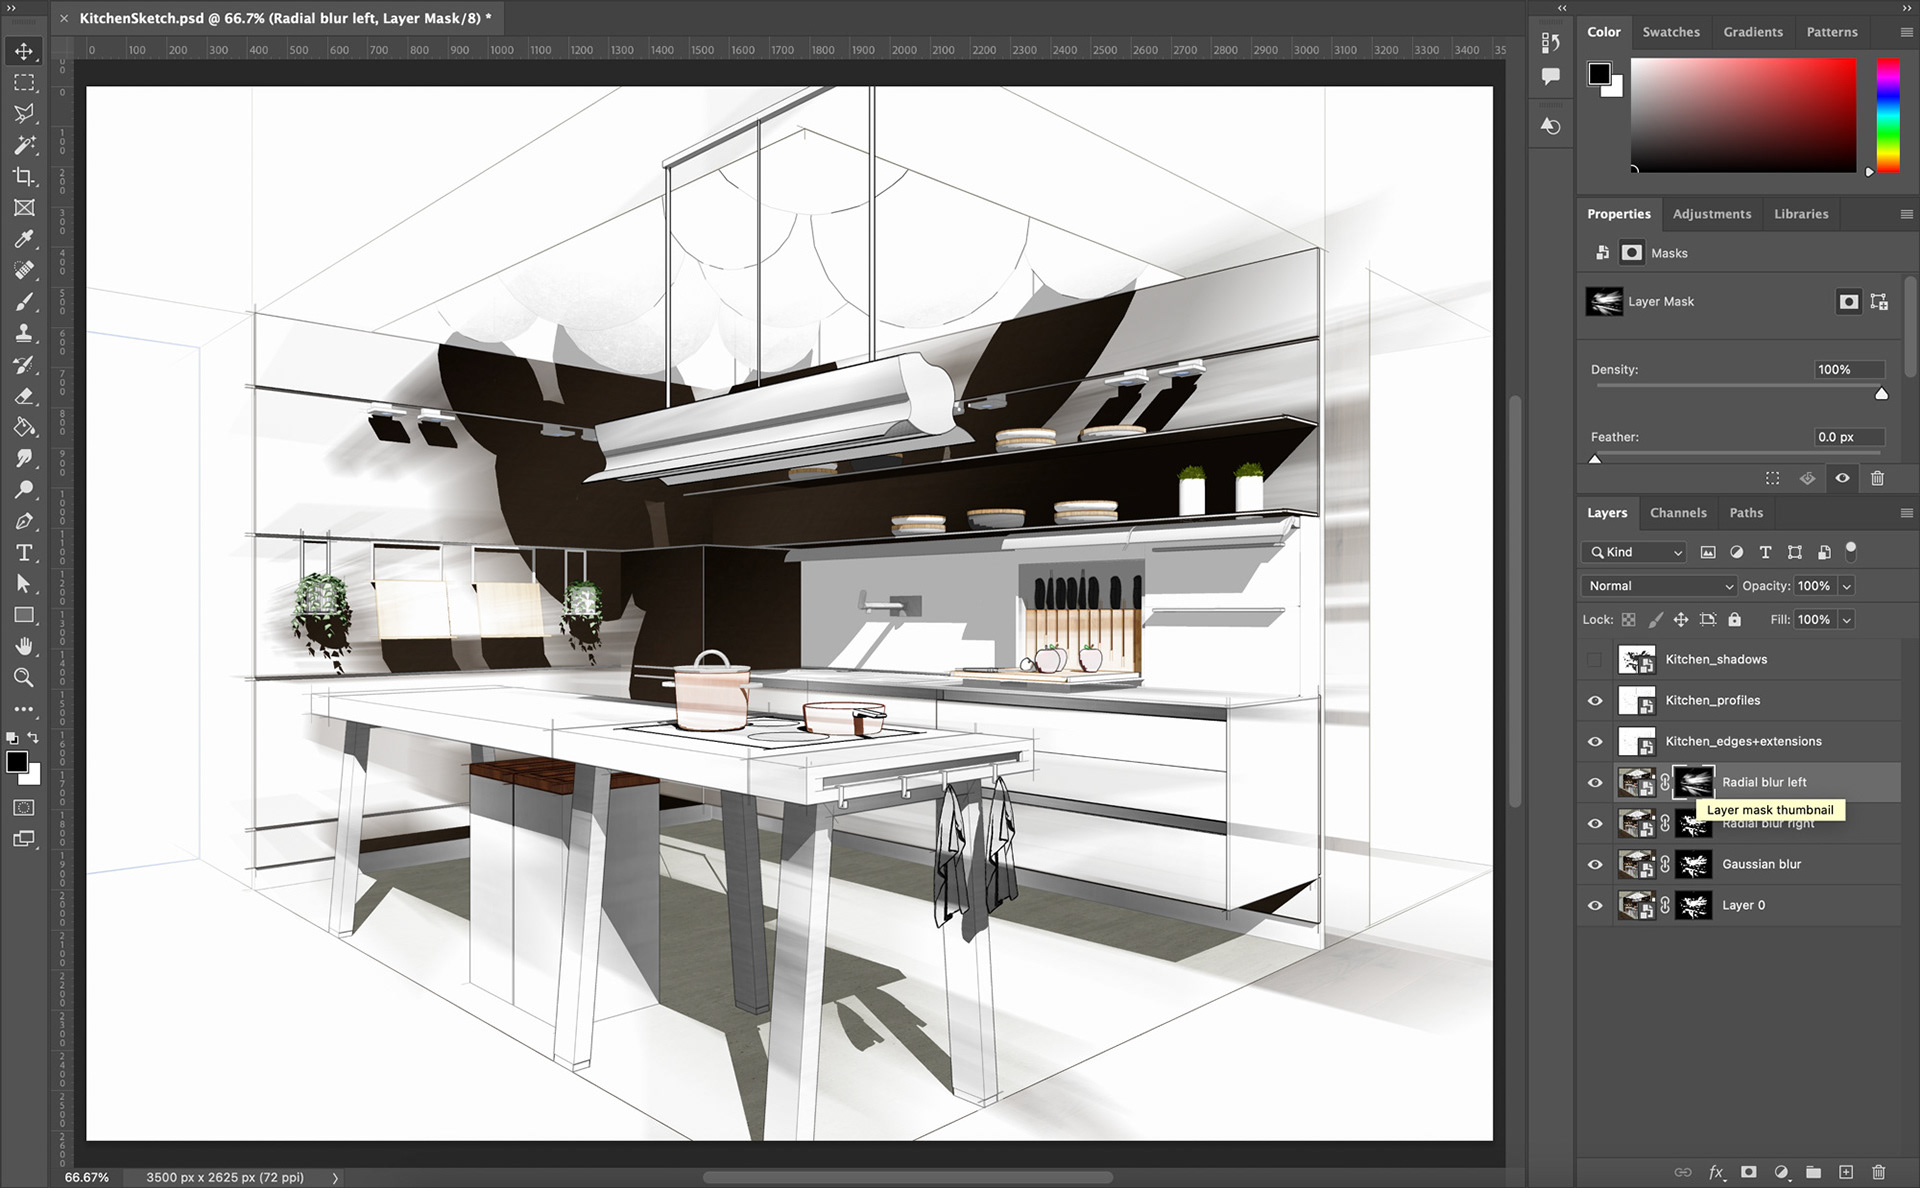
Now do the exact same to blur the mask of the layer called "Radial blur right", but this time setting the center of the blur to the right vanishing point of your scene.

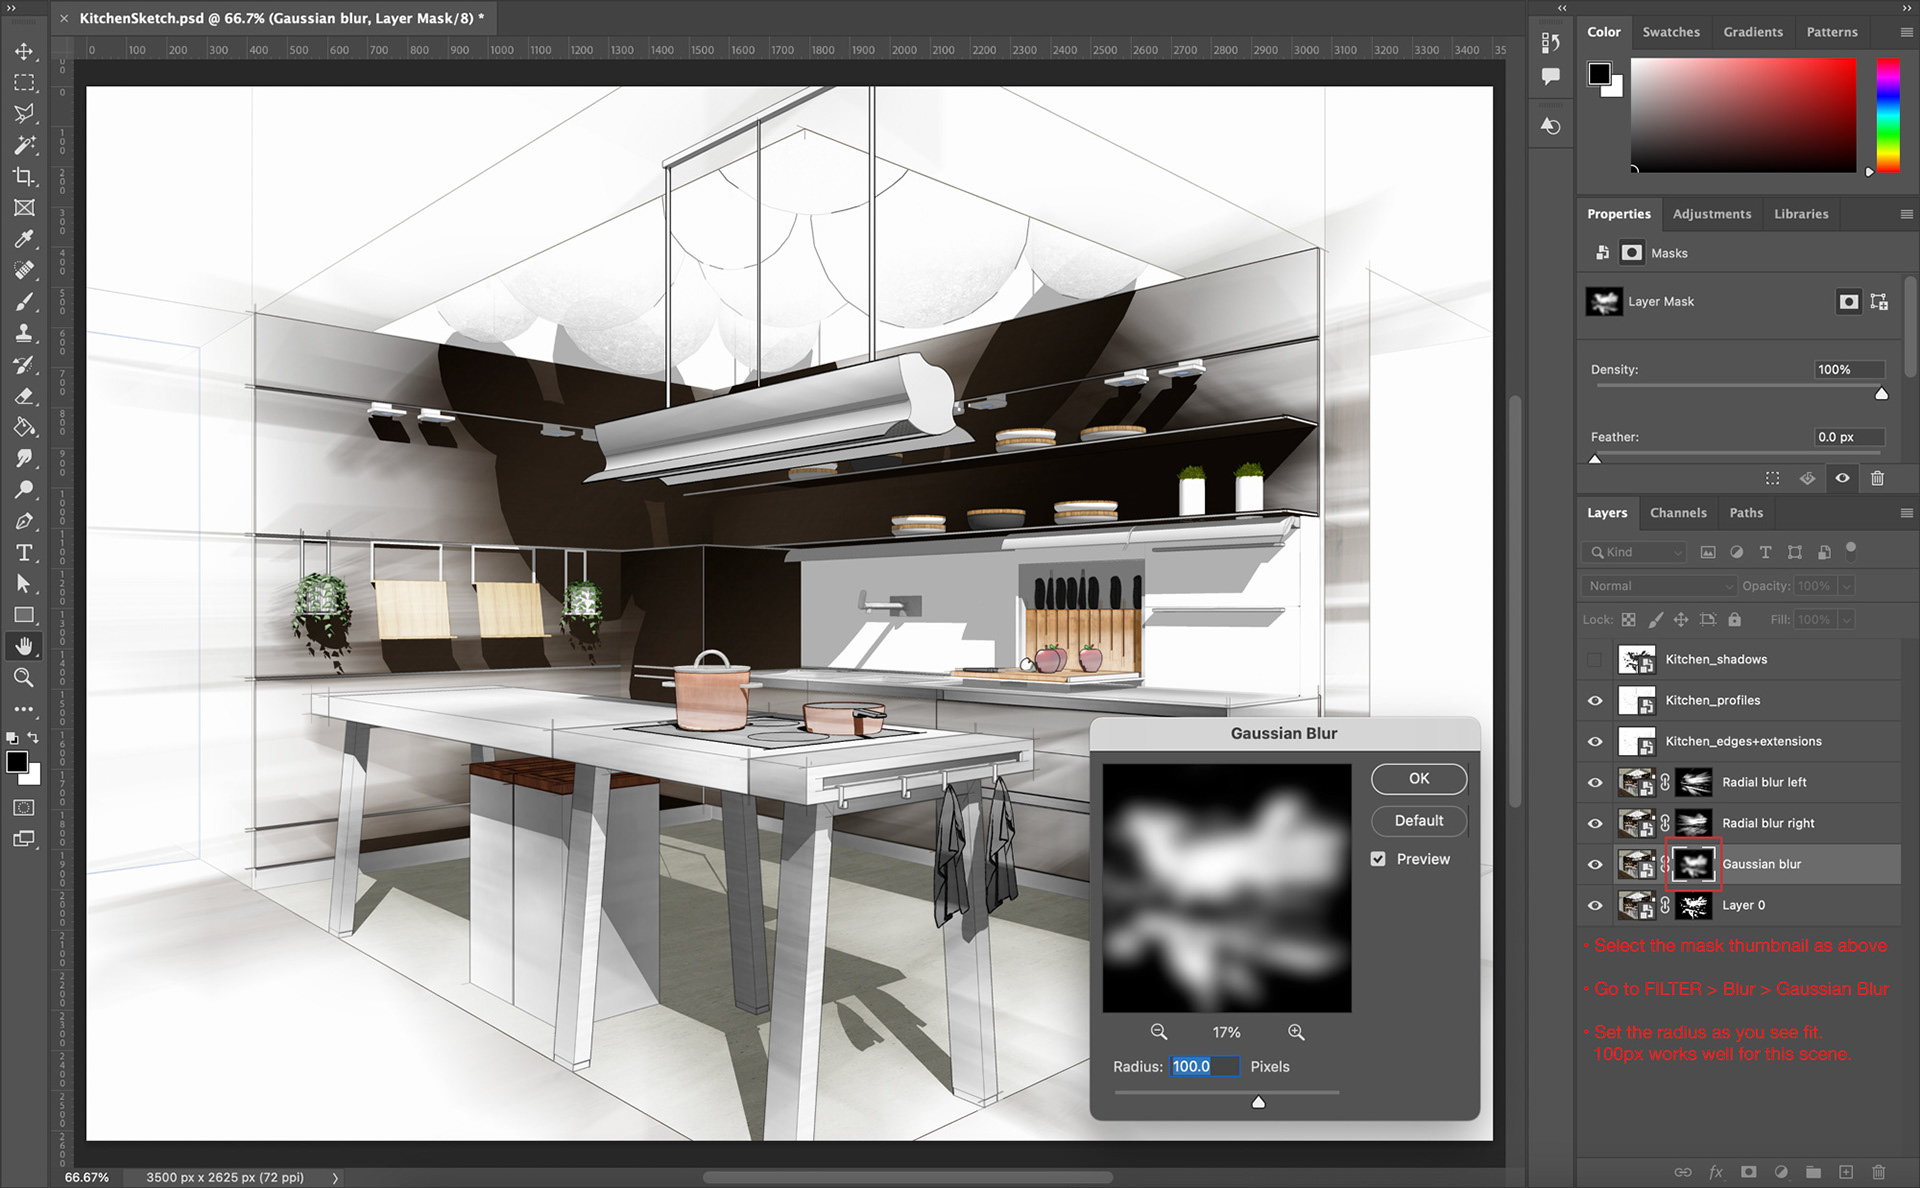
Finally, select the mask of the layer called "Gaussian blur".
Go to FILTER > Blur > Gaussian blur and experiment with the Radius of the blur to reveal more or less textures as you see fit.
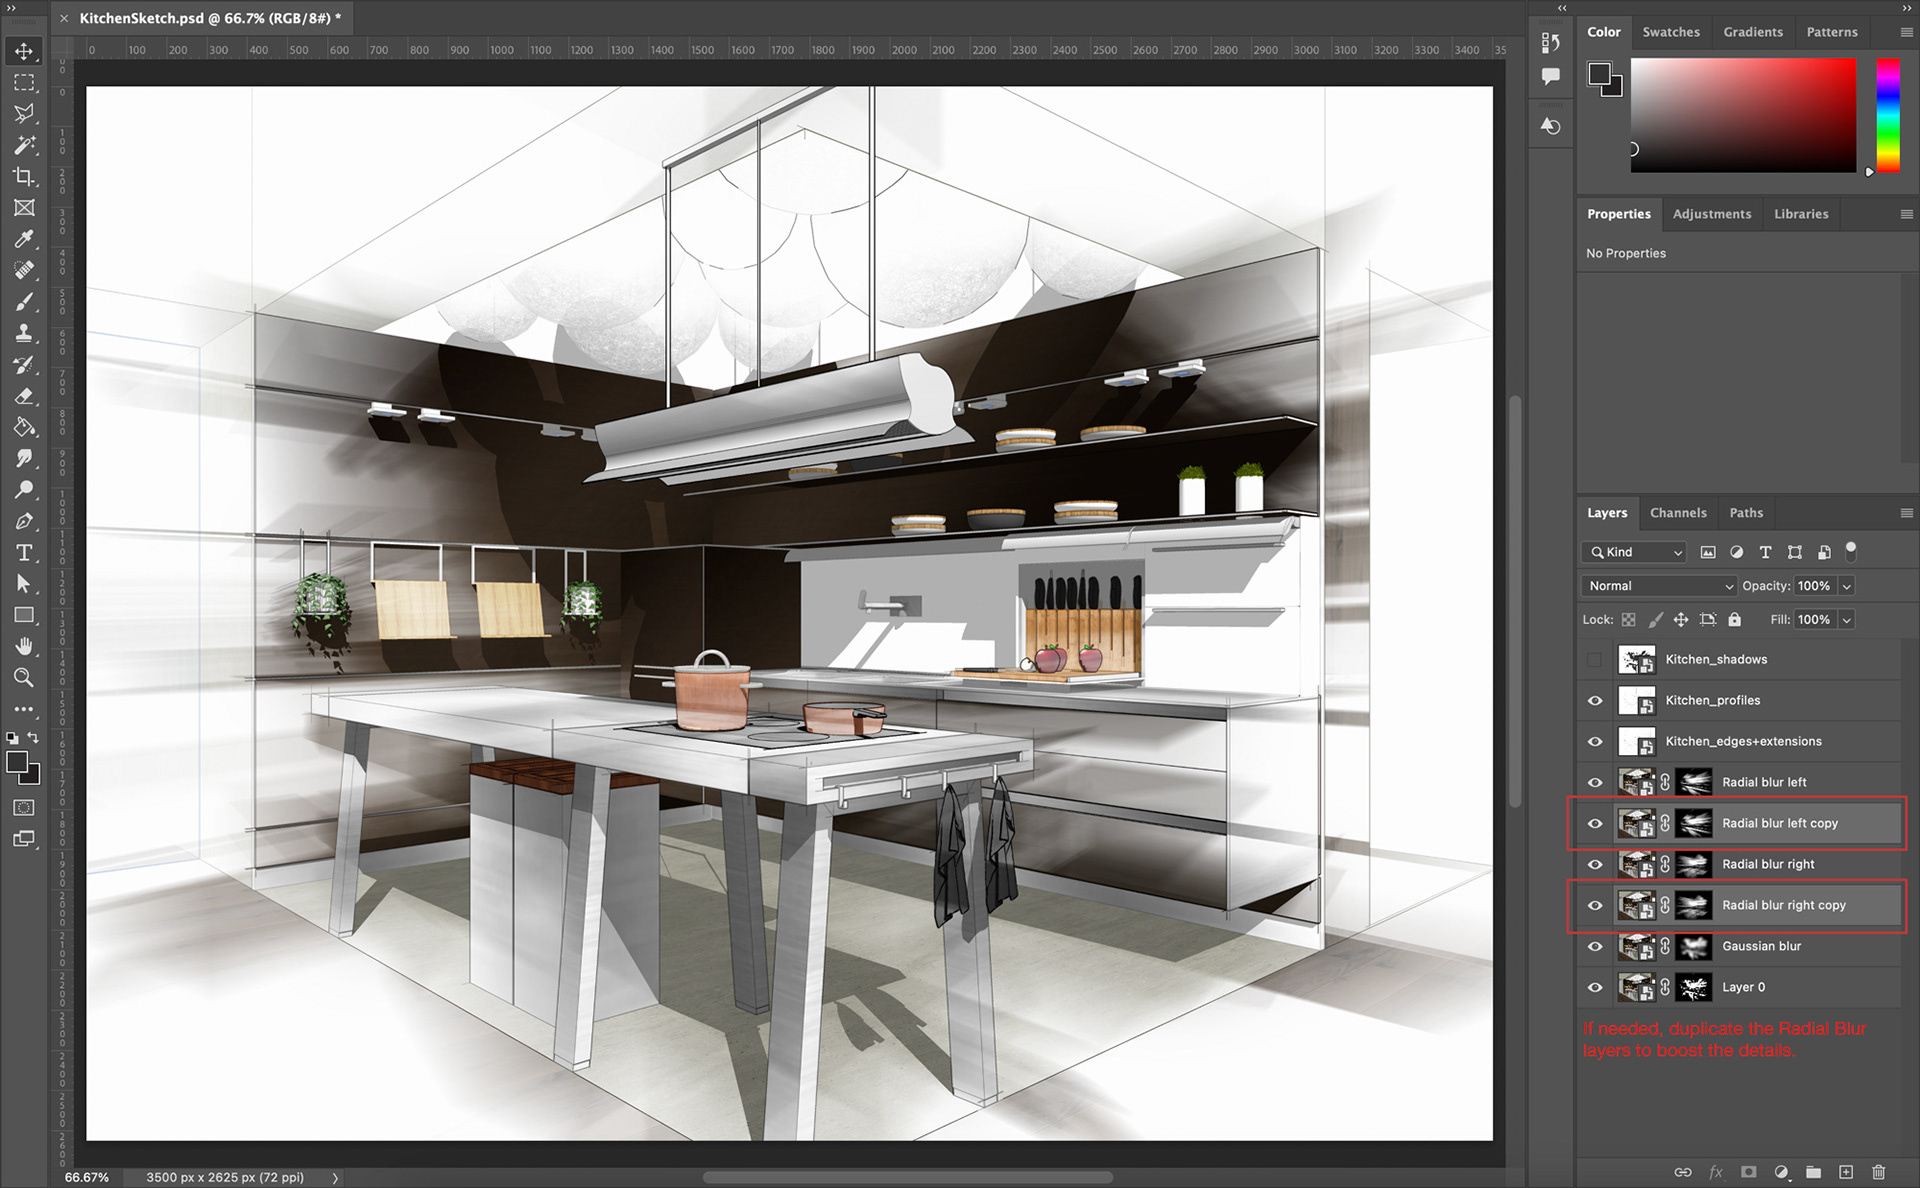
That's it! You're done.
Sometimes I duplicate the 2 "Radial Blur" layers to make them pop out a little more. Sometimes the "Gaussian blur" as well. It all depends of the scene and how light or dark the textures are.
FINAL RESULT
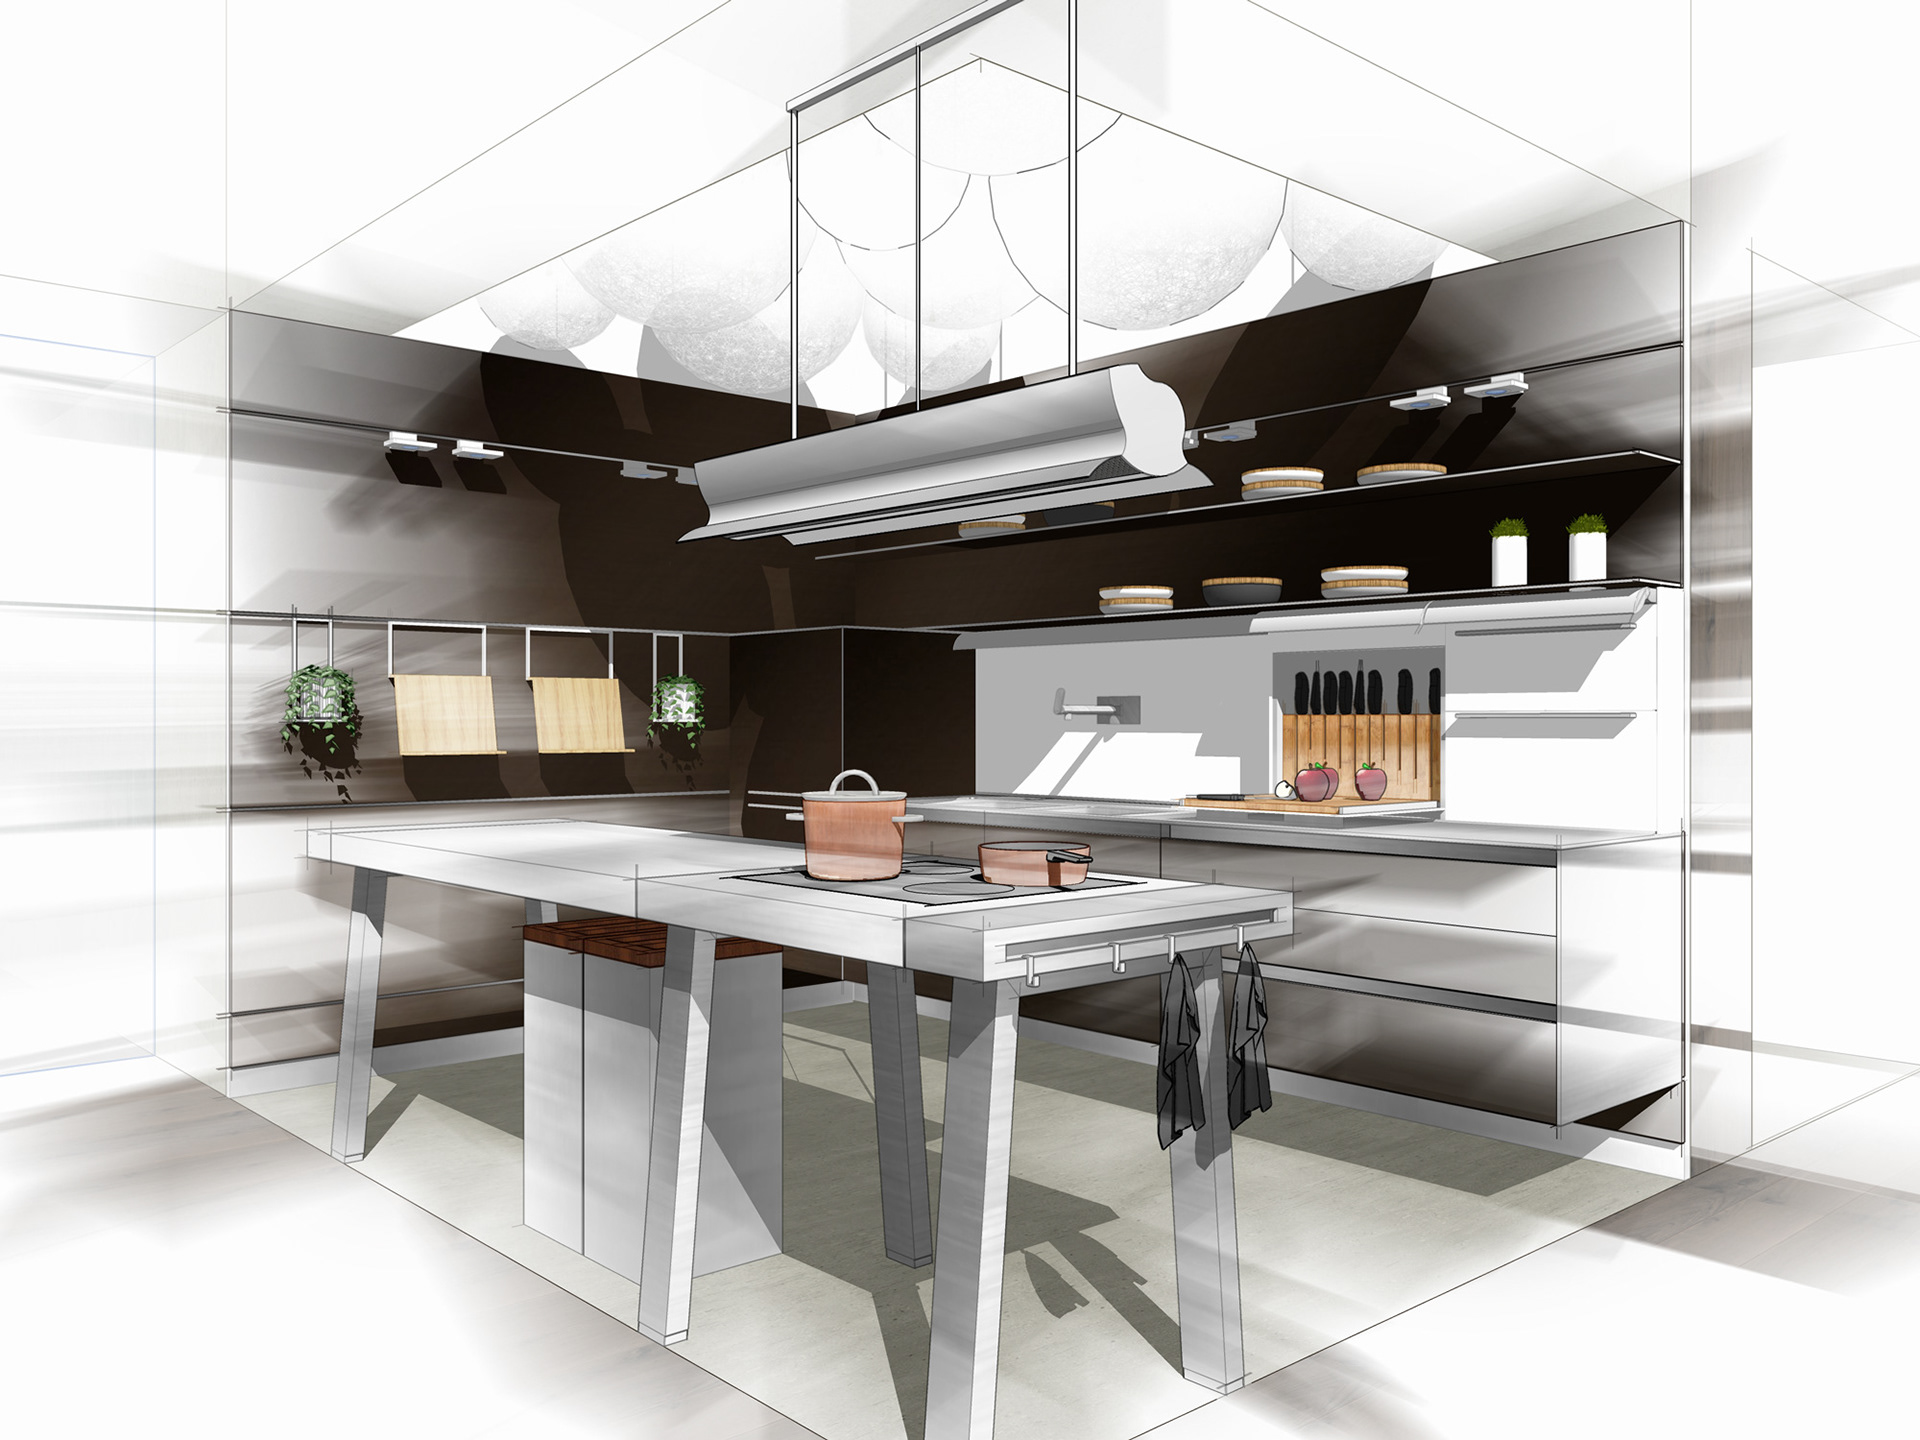
Hope you enjoyed this tutorial.
Send some love if you did!